
TL;DR
A small closet can serve as a great vocal booth because its limited volume reduces echo. The key is proper damping, smart placement, and ventilation. Moving your rig into a closet can drastically cut noise and reflections, but only if you handle heat and airflow properly.
Think your closet is just for shoes and clothes? Think again. Small spaces like closets can turn into surprisingly good vocal booths—if you know how to treat them right.
Most people focus on soundproofing or adding foam first. But the truth is, reducing reflections, sealing gaps, and managing heat make a bigger difference. You’ll learn how to turn a tiny closet into a quiet, echo-free zone for voice work or AI rigs.
Acoustic dampening
& the rig in the closet.
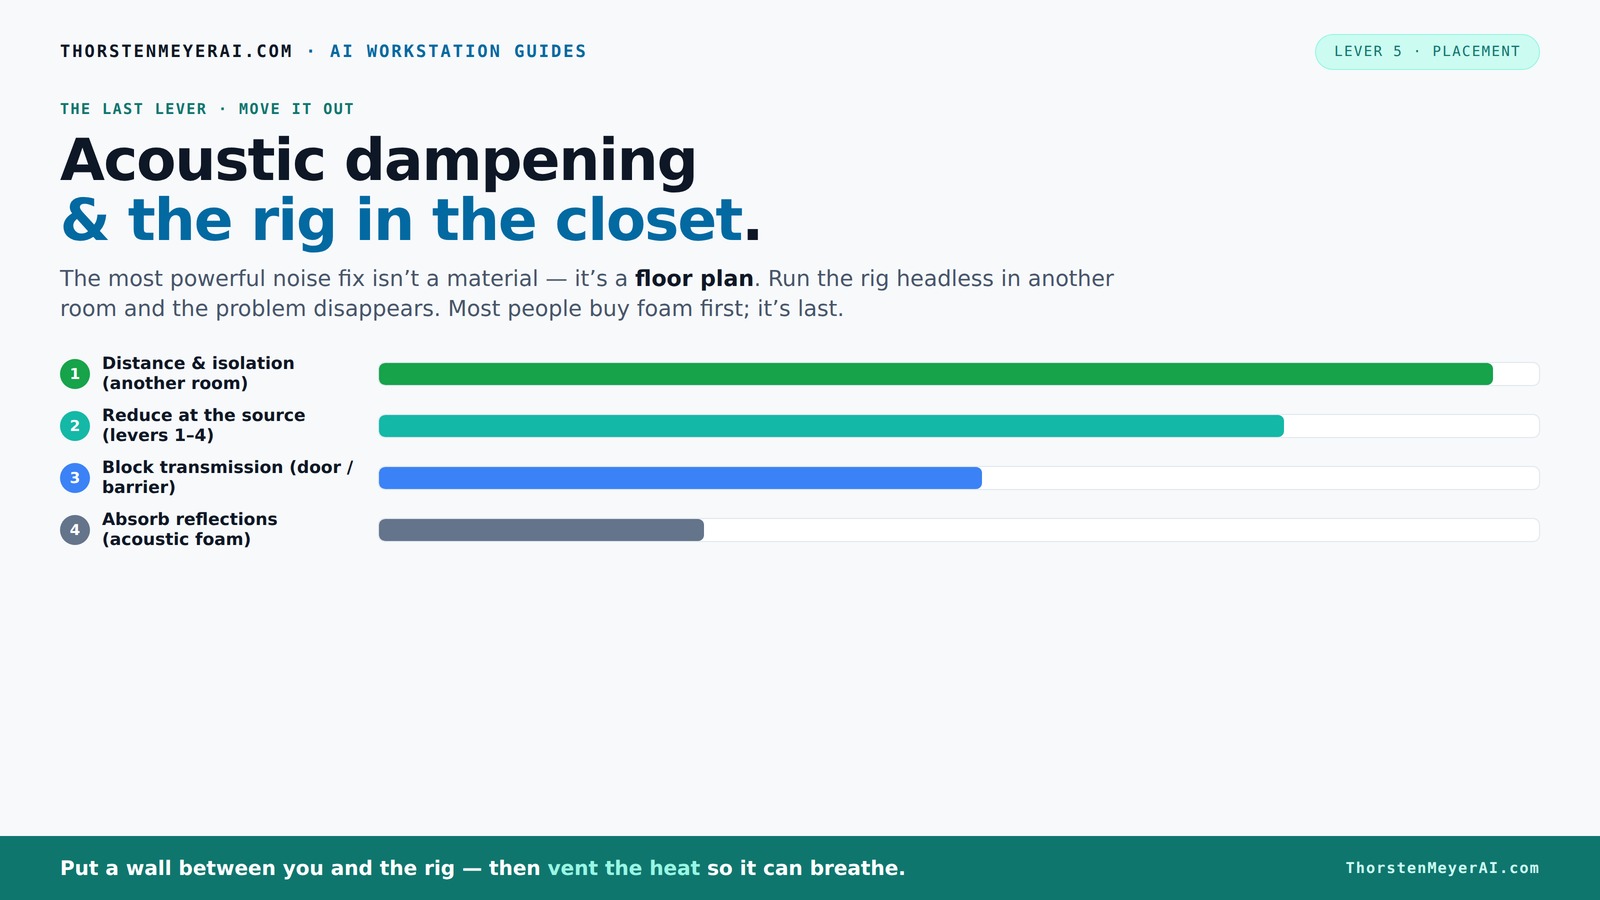
The most powerful noise fix isn’t a material — it’s a floor plan. A rig you can’t hear because it’s in another room beats any amount of foam. Tap the approaches in Part 1 to see what actually works.
(another room)
(levers 1–4)
(door / barrier)
(acoustic foam)
Contain the noise, not the heat
Key Takeaways
- Use your closet as a vocal booth by sealing gaps, treating reflective surfaces, and adding soft absorption materials.
- Proper placement of the microphone—about 6-12 inches from your mouth—maximizes clarity and minimizes reflections.
- Ventilation is critical—use quiet fans or passive vents to prevent overheating, especially in sealed closets.
- Don’t rely solely on foam; add bass traps and thick absorption in corners to tame low-end buildup.
- Sealing gaps around the door with weatherstripping or blankets amplifies noise reduction and sound quality.

Ultimate Portable Vocal Booth for Home Recording, Reduces Echo & Reverb
The Original & Best Portable Vocal Booth — Snap Studio created the category. Pop-up recording space for singers,...
As an affiliate, we earn on qualifying purchases.
As an affiliate, we earn on qualifying purchases.
Why Your Closet Is a Secret Weapon for Sound
A closet naturally reduces echo and reverb because of its small, enclosed shape. Unlike a big room, it’s like talking inside a cardboard box—sound doesn’t bounce around as much.
For voice recording, that means less room echo. But that’s just the start. If you add thick blankets or acoustic panels, you can tame reflections and make your voice sound clear as a bell. Plus, the smaller the space, the easier it is to control sound reflections with simple DIY fixes.
For example, placing a thick rug on the floor and acoustic foam behind your mic can cut down those pesky echoes that turn a voice into a dull, boomy mess.

Focusound 52 Pack Acoustic Foam Panels 1" x 12" x 12" Sound Proof Foam Panles Soundproofing Noise Cancelling Wedge Panels for Home Office Recoding Studio with 300PCS Double-Side Adhesive
Soundproofing - Acoustic foam panels triangular grooves structure for better noise absorption, helps to reduce and absorb unwanted...
As an affiliate, we earn on qualifying purchases.
As an affiliate, we earn on qualifying purchases.
Acoustic Dampening vs. Soundproofing — What You Really Need
Acoustic dampening and soundproofing aren’t the same. Dampening reduces echoes and reflections inside a space, while soundproofing blocks sound from leaking out or coming in.
In a closet, your goal is mostly dampening—making the space less reflective and boxy. Using thick foam, blankets, or even clothing on reflective surfaces can help. Soundproofing, like sealing gaps or adding mass to walls, is a bigger project and often overkill for a closet.
Imagine sealing the door cracks with weatherstripping and hanging a heavy blanket over the door. It’s simple, cheap, and effective for noise control at home.

8" Room to Room Fan with Remote, Reversible Through Wall Fan for Quietly Circulating Air, 320 CFM Through the Wall Fan with Temperature Control, Durable Build Quality, In Wall Fan for Closet, Laundry
【QUIET, MOVE MASSIVE AIR】 This room to room fan quietly circulates air between two rooms to maintain a...
As an affiliate, we earn on qualifying purchases.
As an affiliate, we earn on qualifying purchases.
How to Properly Place Your Gear for the Best Sound
Placement is everything. For a closet mic setup, position your microphone where it captures the cleanest sound—usually about 6-12 inches from your mouth, slightly off-center to avoid plosive hits.
Type of mic matters too. Dynamic mics handle room reflections better in tight spaces. Place absorbent materials behind the mic and at reflection points to prevent sound bouncing back.
For instance, if your closet has a hard wall behind you, put a foam panel there. Drape blankets over nearby hard surfaces like the desk or shelves. This reduces the bounce-back that colors your voice.

Kneelisa 118” Wedge-Shape Foam Window Weather Stripping Door Seal
Upgraded Wedge Design: This window draft stopper features an upgraded wedge design, tapering from 5/32" to 11/32" (0.16"–0.35")...
As an affiliate, we earn on qualifying purchases.
As an affiliate, we earn on qualifying purchases.
Treating Hard Surfaces and the Closet Door Like a Pro
Hard surfaces in a closet—doors, shelves, even the ceiling—are reflection magnets. Cover them with thick blankets, acoustic panels, or foam to absorb sound and prevent echo. Seal gaps around the door with weatherstripping or acoustic sealant.
For example, hanging a moving blanket over the door instantly dampens reflections and noise leaks. Adding foam panels to the ceiling and walls further controls sound bouncing around.
Remember: the goal is to prevent sound from bouncing back into the mic, which turns your voice dull and boxy.
Managing Low Frequencies and Standing Waves in Small Spaces
Small spaces often suffer from bass buildup—those deep, booming sounds that make your voice sound muddy. To fix this, add bass traps in the upper corners of your closet or use thicker absorption materials.
Imagine standing in a tiny closet, your low voice bouncing off the walls and creating a low-end thump. Bass traps absorb those low frequencies and smooth out your sound.
For example, placing a thick panel or foam block in the top corner of your closet can cut down on that boomy quality, making your voice clearer and more natural.
Ventilation and Heat: Keeping Your Closet Rig Cool and Quiet
A sealed closet traps heat like a greenhouse, risking overheating and throttling your rig. Proper ventilation is key. Use quiet exhaust fans, passive vents, or ducted airflow to keep things cool.
For example, a small, low-noise fan can pull hot air out while bringing in cool air. If you’re using a sealed cabinet, consider a temperature-controlled fan system that kicks in only when needed.
Check your setup regularly—if your rig’s fans are roaring, it’s because the temperature is climbing. Good airflow keeps your system happy and quiet.
DIY Tips to Turn Your Closet Into a Pro-Level Vocal Booth
Transforming your closet doesn’t require a full renovation. Use blankets, foam panels, and simple DIY fixes. Seal gaps, add soft materials, and position your mic correctly.
Here’s a quick step-by-step:
- Seal the door with weatherstripping or a thick blanket.
- Hang foam panels or blankets on the walls and ceiling.
- Place absorbent materials directly behind your mic and at reflection points.
- Use a quiet, dynamic mic if possible.
- Ensure proper ventilation—add a small, quiet fan if needed.
These simple steps turn a tiny closet into a surprisingly good vocal booth.
Common Mistakes That Ruin Your Closet Setup
Many DIYers make simple errors that sabotage their sound quality. Avoid treating only corners, neglecting the door gap, or using too little soft material.
For example, ignoring the door gap lets sound escape or enter, ruining your effort. Only treating the corners without sealing the door leaves a major leak.
Another mistake is relying solely on foam panels—thicker, denser materials are often necessary for bass control in small spaces.
Frequently Asked Questions
Is acoustic foam enough for a closet vocal booth?
Acoustic foam helps reduce reflections and echo, but for best results, combine it with thicker absorption materials and bass traps. Foam alone often leaves low-end issues unaddressed.Where should I place foam panels inside my closet?
Place panels directly behind your mic, at reflection points on side walls, and on the ceiling if possible. Covering hard surfaces like the door and desk with blankets or foam also cuts down bounce-back.Do I need to soundproof my closet completely?
Full soundproofing is complex and expensive. For most voice work or AI rigs, sealing gaps and adding soft treatments are enough. Complete soundproofing requires more extensive construction.How do I stop echo in a tiny closet?
Add as much soft, absorbent material as possible—blankets, foam panels, rugs—and cover reflective surfaces. Proper placement ensures your voice stays clear and natural.What if my closet is too small or boxy?
Use dynamic mics, move closer to the mic, and add more soft treatment on walls and ceiling. Adjusting mic placement and treating low-frequency buildup can also help.Conclusion
Your closet isn’t just a makeshift space. With smart placement, proper dampening, and airflow management, it can rival a professional vocal booth. Think of it as your secret weapon for clear, warm, and quiet recordings, no matter your budget.
Remember: the key is focus—dampening reflections, sealing gaps, and keeping it cool. When you get these right, your voice will sound richer, cleaner, and more professional than ever.