
To quickly restore shine to oxidized gelcoat, start by inspecting your surface for dullness or chalky spots. Use a high-quality marine wax or polishing compound with a power buffer or soft applicator to buff out the oxidation, focusing on light to moderate damage. Applying a UV protectant afterward helps prevent future problems. If you want detailed steps to achieve the best results, keep exploring how proper tools and maintenance can make your gelcoat look brand new.
Key Takeaways
- Use a high-quality marine wax and a power buffer for quick removal of light oxidation.
- Apply a specialized oxidation remover or polishing compound with a soft pad or microfiber cloth.
- Opt for dual-action polishers to ensure even, efficient buffing without damaging the gelcoat.
- Thoroughly clean and dry the surface before polishing to maximize shine restoration.
- Regular maintenance, including cleaning and applying UV protectant, prevents future oxidation and preserves the shine.

3M Perfect-It Gelcoat Heavy Cutting Compound, 1 Quart – Fast Cutting Marine Oxidation Remover for Boat & RV Gelcoat Surfaces
For industrial/occupational use only. Not for consumer sale or use.
As an affiliate, we earn on qualifying purchases.
As an affiliate, we earn on qualifying purchases.
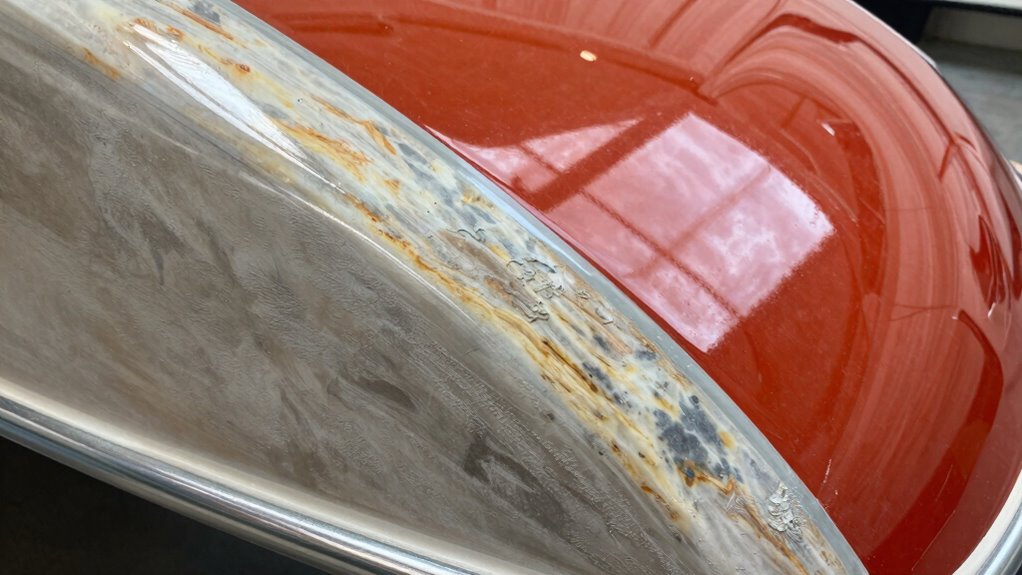
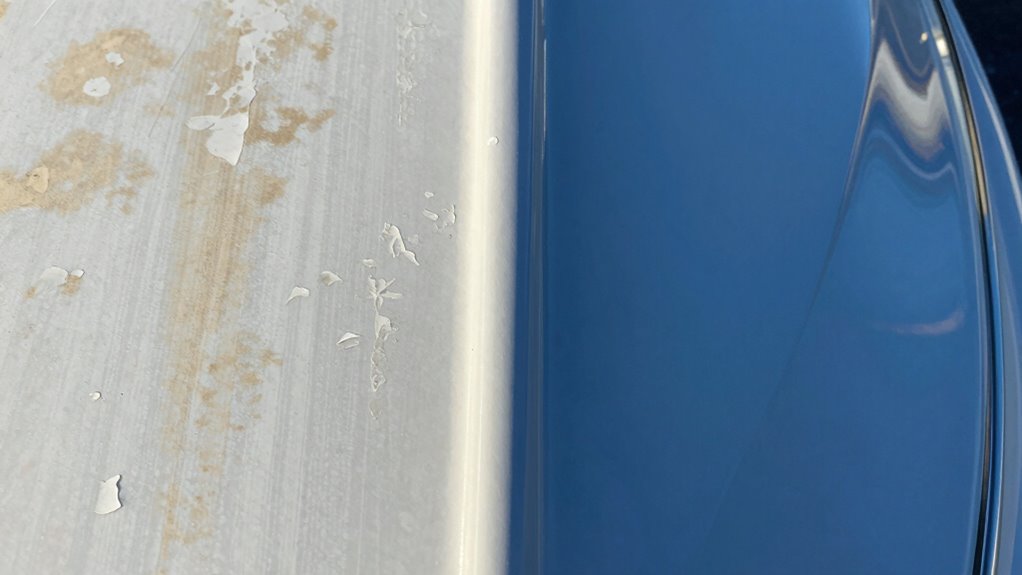
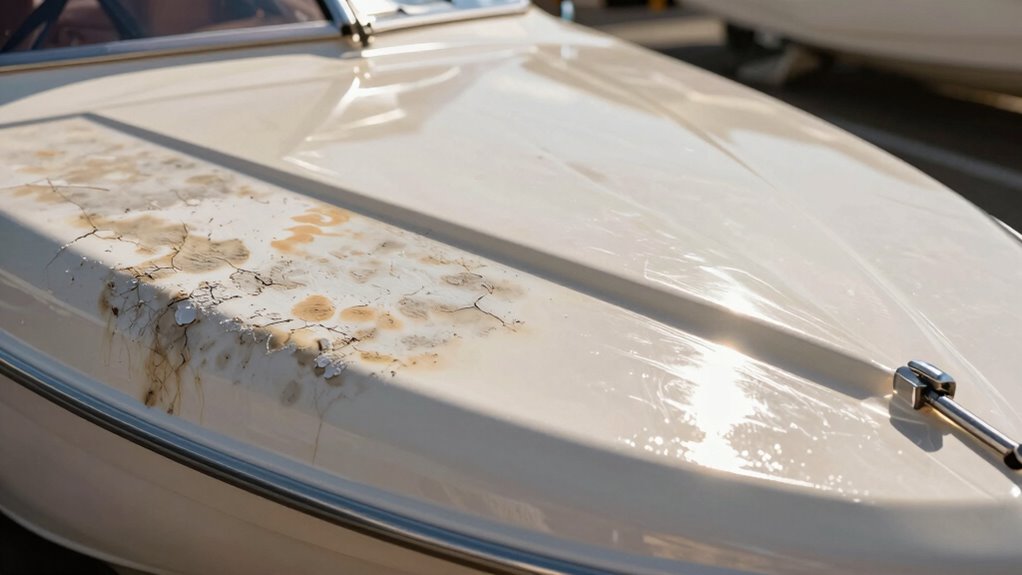
How to Recognize Gelcoat Oxidation on Your Boat or RV
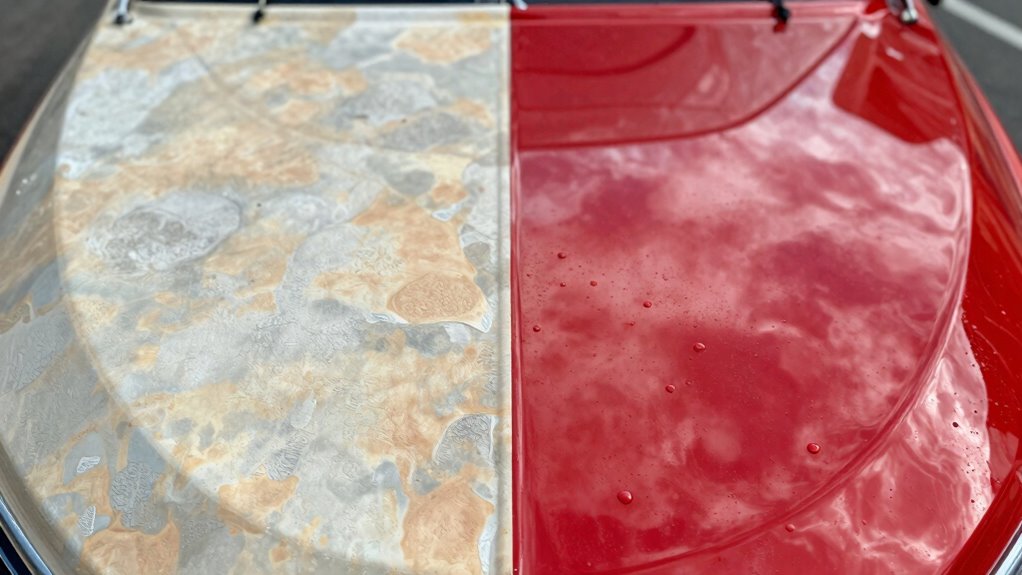
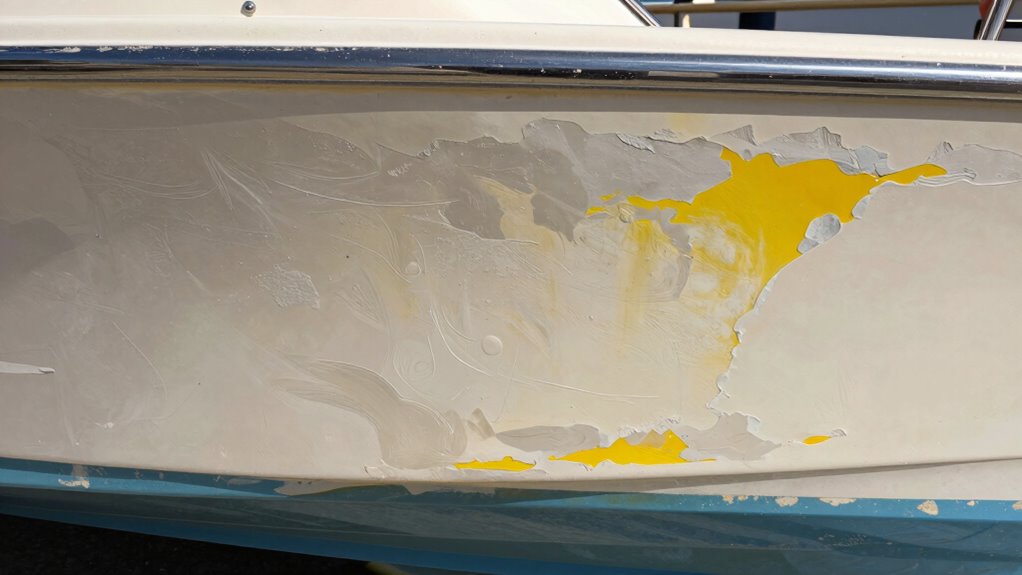
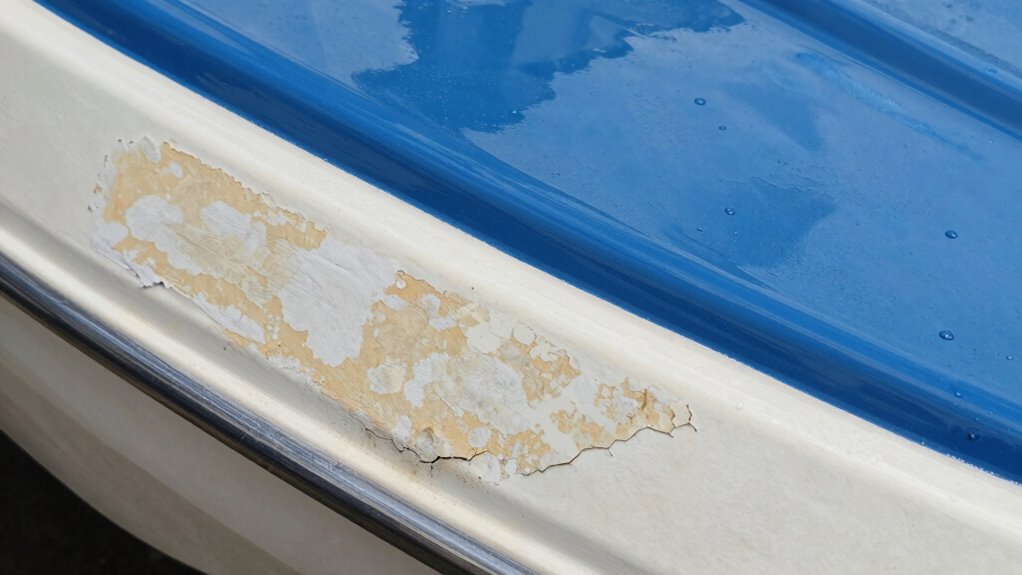
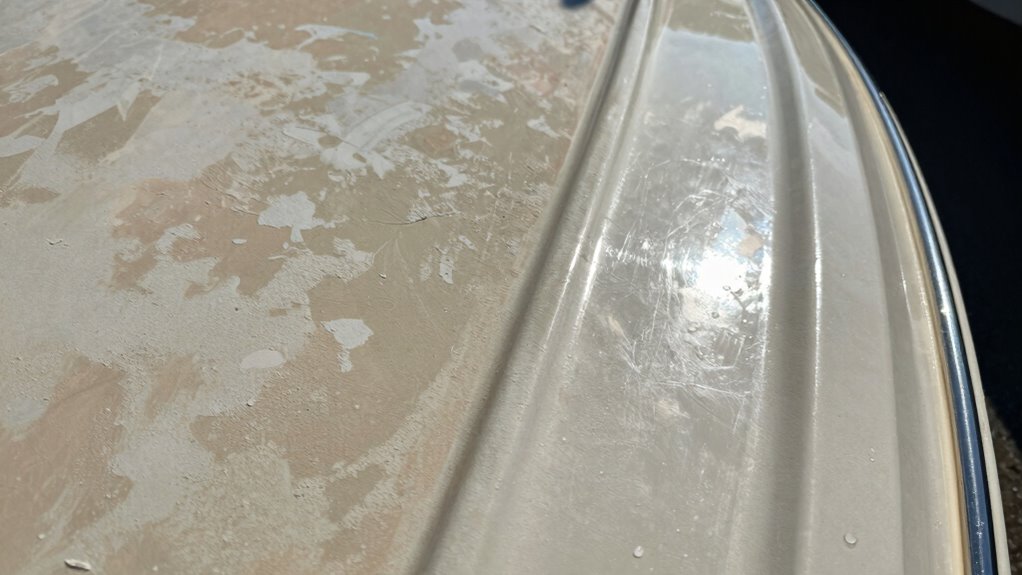
Gelcoat oxidation often shows up as dullness or chalky residue on your boat or RV’s surface. You’ll notice a noticeable color change, with the once vibrant finish fading to a dull, faded hue. The surface may feel rougher to the touch, losing its smooth, glossy texture. This roughness is a key sign that the gelcoat is breaking down and oxidizing. Sometimes, you might see a whitish or chalky film that doesn’t wash away easily, indicating advanced oxidation. Proper surface preparation can significantly improve the effectiveness of your restoration process. The dull appearance combined with a rough texture signals that your gelcoat needs attention. Recognizing these signs early helps you act quickly to restore your surface’s shine and prevent further deterioration. Understanding gelcoat composition can help you choose the most effective restoration method. Regular inspections and proper cleaning techniques are essential for preventing oxidation, and applying suitable wax and sealants can help create a protective barrier against environmental damage. Keeping the surface clean and protected with appropriate waxes or sealants can also prolong the life of your gelcoat and safeguard against UV damage. Keep an eye out for these visual and tactile clues to catch oxidation before it worsens.

Meguiar's M4916 Marine/RV Heavy Duty Oxidation Remover, Oxidation, Water Spot, Stain, and Boat Scratch Remover for Vehicles with Gel Coat and Fiberglass Surfaces, 16 Oz – Packaging may vary
MADE FOR SPECIALIZED BOAT/RV FINISHES: This extremely versatile boat polish quickly and effectively clears problem surface degradation and…
As an affiliate, we earn on qualifying purchases.
As an affiliate, we earn on qualifying purchases.
What Causes Gelcoat Oxidation and How It Affects Your Surface
Sun damage triggers oxidation by breaking down the gelcoat’s protective layer, leaving your surface dull and faded. Chemical reactions, often from exposure to pollutants or cleaning agents, accelerate this process. As a result, your surface loses its shine and becomes more vulnerable to further deterioration. Proper maintenance, such as regular cleaning with appropriate products, can help prevent oxidation and extend the life of your gelcoat.
Sun Damage Effects
Exposure to sunlight accelerates the oxidation process, causing your gelcoat to deteriorate over time. UV damage breaks down the surface’s protective layer, leading to dullness and chalkiness. Sun exposure also worsens salt corrosion, which further weakens the gelcoat’s integrity. As a result, your surface becomes more susceptible to cracks and discoloration. The table below highlights common effects caused by sun damage:
| Effect | Cause |
|---|---|
| Fading color | UV radiation |
| Chalky surface | Prolonged sun exposure |
| Cracks and peeling | Salt corrosion & UV damage |
| Loss of shine | Oxidation from UV rays |
| Surface dullness | Breakdown of protective layer |
Understanding these effects helps you take proactive steps to protect your gelcoat. Protective coatings can form a barrier against UV rays and salt, helping to preserve the surface’s appearance and durability. Regular maintenance and the use of UV-resistant products can significantly slow down the oxidation process. Additionally, proper cleaning techniques can help remove contaminants that may accelerate deterioration. Incorporating energetic alignment practices can also enhance your surface’s resilience against environmental damage. Moreover, applying UV-blocking wax can further improve protection by reflecting harmful rays before they reach the gelcoat surface.
Chemical Reaction Causes
When oxygen and moisture come into contact with the gelcoat’s surface, a chemical reaction called oxidation occurs, gradually breaking down its protective layer. This process involves chemical processes where oxygen interacts with the gelcoat’s surface, leading to changes in its molecular structure. The oxidation mechanisms involve the loss of electrons from the gelcoat’s compounds, resulting in a dull, chalky appearance. Over time, UV rays and environmental pollutants accelerate these chemical reactions, causing the gelcoat to weaken and lose its shine. Environmental exposure can significantly speed up these processes, making it crucial to protect your surface from harsh conditions. Understanding these chemical reactions helps you grasp how environmental factors directly contribute to gelcoat deterioration. Recognizing the importance of surface protection can help you implement preventative measures to extend the lifespan of your gelcoat. By recognizing the causes behind oxidation, you can better prevent or reverse the damage, restoring your surface’s original luster and protecting it from further harm.
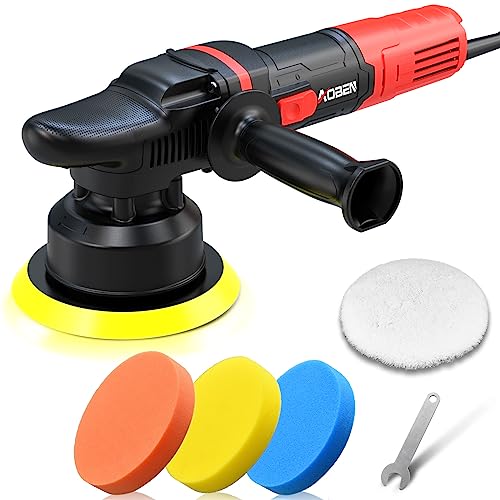
AOBEN Car Buffer Polisher,6 inch Dual Action Polisher,Random Buffer Polisher kit with 6 Variable Speed 1000-4500rpm,Detachable Handle,4 Buffing Pads for Car detailing Polishing and Waxing
🚗【6 SPEED ELECTRIC BUFFER 】120V,60Hz ,700W,6-Inch polisher; dual action Random orbital copper motion for optimal movement to achieve…
As an affiliate, we earn on qualifying purchases.
As an affiliate, we earn on qualifying purchases.
The Fastest Ways to Restore Oxidized Gelcoat
Restoring oxidized gelcoat quickly requires targeted cleaning and polishing techniques. Start with a high-quality marine wax to buff away surface oxidation, revealing a brighter shine. Applying a UV protectant afterward helps prevent future oxidation and keeps your gelcoat looking fresh longer. For best results, use a polishing compound designed for oxidized surfaces, which gently removes dullness without damaging the gelcoat. Additionally, using proper cleaning techniques can significantly improve restoration outcomes. Regular maintenance, including protective coatings, is essential to keep your gelcoat looking vibrant over time. Incorporating advanced polishing tools can also enhance the effectiveness of your restoration process. Maintaining consistent care and visual inspections helps identify early signs of oxidation, making it easier to address issues promptly.

Meguiar's Flagship Premium Marine Wax M6316 – Synthetic RV and Boat – Durable Fiberglass and Gel Coat Protection for a Long-Lasting Shine – Professional-Grade with UV Protection, 16 Oz Liquid
EASY TO USE: Our formula offers long-lasting polymer protection and incredible deep gloss to fiberglass and gel coat…
As an affiliate, we earn on qualifying purchases.
As an affiliate, we earn on qualifying purchases.
How to Clean and Inspect Your Gelcoat Before Restoration

Before you start restoring your gelcoat, it’s essential to thoroughly clean and inspect the surface. Remove surface contaminants such as dirt, grease, and algae using a gentle, marine-safe cleaner. This prevents them from scratching or damaging the gelcoat during restoration. After cleaning, rinse thoroughly and guarantee the surface is free of any residue. Proper drying is vital; use a clean, dry cloth to wipe down the area and allow it to air dry completely. Inspect the gelcoat carefully for cracks, chips, or areas of severe oxidation that may require special attention. Taking the time to clean and properly dry your surface ensures a smooth, contamination-free base for effective restoration, ultimately leading to a better shine and longer-lasting results. Additionally, understanding cabling solutions can help prevent future issues during the repair process. Ensuring proper surface preparation is a fundamental step in achieving optimal gelcoat restoration results. Recognizing the importance of performance cookies can provide insight into how your restoration efforts impact your boat’s surface over time. Being aware of protective gear options can also help safeguard your hands and skin during the cleaning and restoration process. Incorporating proper inspection techniques can further identify underlying issues that might compromise the restoration process.
Selecting the Quickest Method: Polishing, Compounding, or Restoring Products
When choosing between polishing, compounding, or restoring products, you’ll want to contemplate how quickly each method works. The extent of damage to your gelcoat also plays a role in determining the best approach. Additionally, think about your budget and what supplies are readily accessible to make the process smoother. For instance, understanding best anime movies can sometimes inspire creative ideas for restoration techniques or simply serve as a relaxing distraction during the project. Considering proper heat buffering techniques can help prevent further damage during the restoration process.
Speed of Application
Choosing the fastest method to address gelcoat oxidation depends on the severity of the damage and your available time. For quick results, polishing is usually the fastest option, especially if the oxidation is light. Restoring products can be applied swiftly but may require some work to buff out. Compounding takes longer but offers a deeper clean for more stubborn oxidation. Consider environmental factors like exposure to sun, salt, or chemicals, which can speed up oxidation and influence your choice. Regular maintenance tips, such as rinsing after saltwater use or applying protective wax, help slow down oxidation and reduce application time in future repairs. Ultimately, selecting the quickest method hinges on your specific situation and understanding how environmental factors impact gelcoat condition.
Level of Damage
The extent of gelcoat damage directly influences the most efficient repair method. For minor surface oxidation, polishing works best, preserving gelcoat durability while restoring shine. Moderate damage may require compounding to remove deeper oxidation spots. Severe oxidation, which compromises the gelcoat’s integrity, often demands restorative products or even professional resurfacing. Use this guide to gauge damage:
| Damage Level | Recommended Method |
|---|---|
| Light | Polishing |
| Moderate | Compounding |
| Severe | Restoring Products |
| Extensive | Professional Resurfacing |
Understanding oxidation severity helps you choose the fastest, most effective solution, preventing unnecessary work or damage. Always assess how deeply oxidation penetrates to decide whether polishing, compounding, or restoring products suit your gelcoat’s durability.
Cost and Accessibility
Selecting the quickest repair method depends heavily on your budget and access to supplies. If you want to restore your gelcoat’s shine quickly, polishing or compounding are often the most accessible options. These methods require minimal equipment and are generally cost-effective solutions, especially if you already own polishing pads or compounds. For those with limited access to professional gelcoat painting, these DIY options save time and money. Restoring products designed specifically for gelcoat oxidation may cost more upfront but can be more effective. Consider the level of damage and your experience when choosing between polishing, compounding, or specialized restorers. Ultimately, your budget and available tools will guide you toward the most accessible, economical method to bring back your gelcoat’s original gloss.
Step-by-Step: How to Buff Out Oxidation Quickly
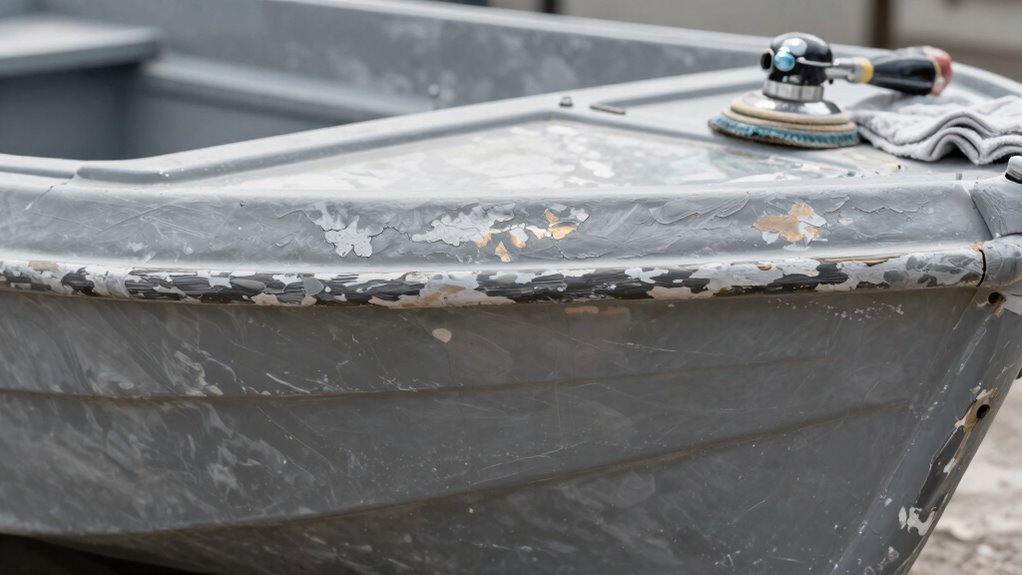
When you notice your gelcoat has started to oxidize, acting quickly can prevent long-term damage. Start by cleaning the surface thoroughly to remove dirt and debris. Next, follow these steps for effective buffing:
- Apply a small amount of eco friendly polishing compound or a specialized oxidation remover using a soft cloth or foam applicator.
- Use a power buffer with a moderate speed setting, employing gentle, overlapping passes to ensure even coverage.
- Finish by wiping the surface with a clean microfiber cloth to reveal the restored shine and remove any residue.
For advanced techniques, consider using a dual-action polisher for consistent results. Always prioritize eco friendly solutions to protect your boat and the environment while restoring your gelcoat efficiently.
Tips for Using Hand Tools vs. Power Buffers Effectively

Choosing the right tool depends on the size and condition of the gelcoat surface you’re working on. Proper surface preparation and handling are key to avoiding damage and achieving a smooth finish. Always prioritize safety by using the correct techniques and protective gear, whether you’re using hand tools or power buffers.
Tool Selection Tips
To achieve the best results when addressing gelcoat oxidation, understanding how to use hand tools and power buffers effectively is essential. Choosing the right tool depends on your goals and gelcoat durability.
- Use hand tools for delicate areas or when precision is key, avoiding unnecessary wear that can worsen oxidation myths.
- Opt for power buffers for larger surfaces to save time and ensure even coverage, but be careful not to apply excessive pressure that can damage the gelcoat.
- Always test your chosen method on a small area first to prevent unintended damage and confirm the effectiveness of your approach.
Surface Preparation Techniques
Effective surface preparation is essential for restoring gelcoat and preventing further oxidation. When choosing between hand tools and power buffers, consider the task’s intensity. Hand tools, like polishing pads or scrapers, give you control for delicate areas and light oxidation. They’re ideal for applying marine wax or performing surface sealing without risking damage. Power buffers, on the other hand, provide faster results for stubborn oxidation and larger surfaces. Use a soft pad and moderate speed to avoid overheating or gouging the gelcoat. Always clean the surface thoroughly before applying wax or sealant. Proper preparation ensures the gelcoat is smooth and free of debris, maximizing shine and protection. Whether using hand tools or buffers, your goal is a clean, even surface that enhances the effectiveness of your finish products.
Safety and Handling
When working with hand tools and power buffers, safety should always come first to prevent injuries and damage. Proper handling guarantees a smooth process and lasting results.
- Always wear protective gear, including gloves, goggles, and a dust mask, to shield against debris and chemical exposure.
- Follow chemical safety guidelines by working in well-ventilated areas and avoiding spills.
- Use the right tools for the job—gentle hand tools for delicate areas and power buffers for larger surfaces—keeping a firm grip and controlling speed.
Applying Gelcoat Polish or Restorer for a Long-Lasting Shine
Applying gelcoat polish or restorer properly is essential for achieving a long-lasting shine on your boat’s surface. When you use the right product and technique, you enhance your boat maintenance routine and extend the gelcoat’s longevity. Start by cleaning the surface thoroughly to remove dirt and oxidation. Use a clean, soft applicator pad to apply the polish or restorer in small, circular motions. Work in manageable sections to ensure even coverage. After applying, buff the area with a clean microfiber cloth to bring out the shine. Regular use of quality gelcoat polish not only restores your boat’s appearance but also protects against future oxidation. Proper application is key to maintaining a glossy, vibrant look that lasts longer and keeps your boat looking its best.
How to Maintain Your Gelcoat and Prevent Future Oxidation
To keep your gelcoat looking its best and prevent oxidation from returning, regular maintenance is essential. Proper boat maintenance involves simple steps to extend its shine and durability. First, consistently wash your boat with fresh water after each use to remove dirt and salt that can accelerate oxidation. Second, apply a UV protectant regularly; UV protection shields your gelcoat from harmful rays that cause oxidation and fading. Third, polish your gelcoat every few months using a high-quality gelcoat restorer, which helps maintain the shine and adds a protective layer. These steps not only preserve your boat’s appearance but also reduce the need for costly restorations. Staying proactive with maintenance guarantees your gelcoat stays vibrant, protected, and free from future oxidation.
Common Mistakes to Avoid When Restoring Oxidized Gelcoat
Restoring oxidized gelcoat can dramatically improve your boat’s appearance, but rushing the process or skipping important steps often leads to poor results. One common mistake is neglecting proper surface preparation—failing to clean or de-wax can cause uneven polishing and streaks. Another mistake is using the wrong products or tools, which can damage the gelcoat further. You should also avoid skipping steps like sanding or applying a polish, as these are vital for a smooth finish. Additionally, rushing through the process can cause overheating, leading to surface burns. Proper boat maintenance and surface prep are key to a successful restoration. Here’s a quick guide to avoid mistakes:
| Mistake | Consequence | Solution |
|---|---|---|
| Skipping surface prep | Uneven shine, scratches | Clean and de-wax thoroughly |
| Using incorrect products | Damage to gelcoat | Use recommended products |
| Rushing the process | Burn marks, poor finish | Take your time |
| Ignoring safety measures | Injury or damage | Follow safety protocols |
| Neglecting maintenance | Future oxidation issues | Regular upkeep |
Frequently Asked Questions
How Often Should I Reapply Gelcoat Polish After Restoration?
You should reapply gelcoat polish every 3 to 6 months to maintain your boat’s shine. Establish a regular polishing schedule based on how often you use your boat and exposure to the elements. This frequency maintenance prevents oxidation from building up again and keeps your gelcoat looking its best. Keep an eye on the gloss and re-polish sooner if you notice dullness or oxidation returning.
Can Environmental Factors Accelerate Gelcoat Oxidation?
Environmental factors like UV exposure and salt water act like relentless thieves stealing your gelcoat’s shine. Sunlight’s rays accelerate oxidation, turning smooth surfaces into dull, chalky shells. Salt water, with its corrosive touch, speeds up this process, especially in marine environments. To protect your gelcoat, regularly wash with fresh water and apply UV protectants, shielding it from these harsh elements and keeping your boat gleaming brightly.
Is It Safe to Use Power Buffers on Delicate Gelcoat Surfaces?
Yes, you can use power buffers on delicate gelcoat surfaces, but you must prioritize buffering techniques and polishing safety. Use a soft pad and low speed to prevent damage, and always test on a small area first. Keep the buffer moving steadily, avoiding prolonged pressure in one spot. Proper techniques guarantee you restore shine effectively without risking further oxidation or surface damage.
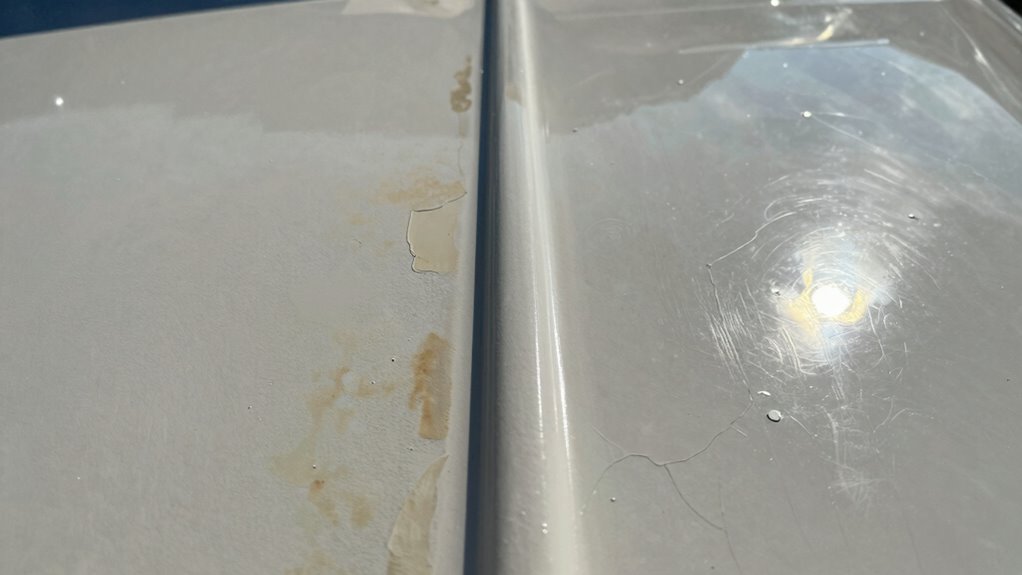
What Are the Signs of Over-Polishing or Damaging Gelcoat?
You’ll notice over-polishing or damaging gelcoat when you see abrasion marks or uneven gloss. These signs indicate that the surface has been excessively buffed, removing too much material and exposing the underlying layers. If your gelcoat looks dull, patchy, or has visible scratches, it’s a sign you’ve gone too far. To avoid this, use gentle motions, proper pads, and avoid applying too much pressure during polishing.
How Long Does a Typical Gelcoat Restoration Last Before Re-Treatment?
Your gelcoat restoration typically lasts between one to three years, but this can vary wildly depending on exposure and maintenance. Think of gelcoat durability as a ticking clock—if you keep up with regular polishing and waxing, your shine can stretch longer. Without proper care, the restoration’s longevity shrinks dramatically. So, for lasting results, stay vigilant with upkeep, and expect to re-treat every year or so to keep that glossy finish.
Conclusion
Restoring your gelcoat’s shine is quick and achievable with the right approach. By understanding oxidation signs and choosing the proper restoration method, you can effectively bring back that glossy finish. Keep in mind, some experts believe regular maintenance prevents oxidation more than any quick fix. So, stay consistent with cleaning and polishing to protect your investment long-term, proving that prevention truly is better than cure when it comes to gelcoat care.