
If you spot signs of a thru-hull leak like water in the bilge or hull sounds, act quickly. Make certain your safety first by grabbing life jackets and emergency gear. Shut off the seacock to stop water intake and inspect the leak area using tools like flashlights or mirrors. Apply a temporary patch with epoxy or tarp, then call for help. For detailed steps to handle the situation and prevent future issues, continue exploring effective response methods.
Key Takeaways
- Quickly recognize signs of a leak and assess the severity to determine immediate action needed.
- Ensure personal safety by gathering life jackets, communication devices, and avoiding unsafe repair attempts.
- Locate and shut off the main seacock or valve to stop water ingress as swiftly as possible.
- Use temporary patches like epoxy or tarps to control water flow until permanent repairs can be made.
- Communicate with rescue services via radio, providing location details and requesting assistance.

Marine Fiberglass Repair Kit for Boats, Gel Coat Repair Kit for Boats, Epoxy Filler for Fiberglass Boats Fix Holes, Chips and Deep Cracks, Gelcoat repair kit for Fiberglass, Acrylic, Porcelain(White)
Marine Fiberglass Repair Kit: This all-in-one epoxy filler can fix fiberglass boat damage efficiently, repairing deep scratches, cracks,…
As an affiliate, we earn on qualifying purchases.
As an affiliate, we earn on qualifying purchases.
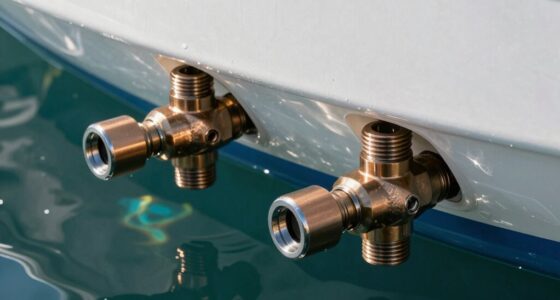
Recognize the Signs of a Thru-Hull Leak
A thru-hull leak can develop suddenly or gradually, but recognizing the signs early can prevent serious damage. Pay close attention to any unusual sounds, such as hissing or dripping, which may indicate water escaping through compromised boat materials. Watch for unexpected water intrusion or pooling around the hull or below deck. Changes in boat stability or a sudden increase in water level can also signal a leak. Regular inspections of hull fittings and hardware help identify vulnerabilities before they worsen. Understanding your boat’s materials and construction can improve leak prevention strategies. Monitoring systems like alarms and surveillance cameras can also monitor for environmental anomalies that might indicate a leak or intrusion. Additionally, knowing the art of inspection can help you identify issues before they become critical. Conducting routine visual inspections can uncover signs of wear or corrosion that may lead to leaks. Being familiar with hull materials and construction techniques enhances your ability to spot potential problems early. Early detection allows you to act quickly, minimizing water ingress and damage. Staying vigilant and familiar with these signs empowers you to respond swiftly and protect your vessel effectively.

YINTTIAN Waterproof Repair Tape for Bounce House, Inflatable Pool, Tent, Leather, RV Awning Outdoor Heavy Duty Plastic Repair Patch for Tarp, Canopy and Boat Cover, 5 Inch x 5FT, Clear
Thick & Reinforced: At 11.81 mil thickness, YINTTIAN TPU tape is 2x stronger than standard repair tapes, offering…
As an affiliate, we earn on qualifying purchases.
As an affiliate, we earn on qualifying purchases.
Ensure Safety First and Gather Emergency Equipment
Your first step is to guarantee your safety by staying calm and avoiding further risk. Quickly locate your emergency gear, such as life jackets and communication devices, so you’re prepared to respond. Assess the immediate hazards around you to determine the best course of action before addressing the leak. Remember to stay hydrated to maintain clarity and focus during the emergency. Recognizing the importance of emergency preparedness can help you act more effectively in high-stress situations. Additionally, understanding your security zone info can provide valuable insights into potential safety protocols during such incidents. Being familiar with disaster response plans can further improve your ability to handle the situation effectively. Familiarity with essential safety gear can ensure you have the right equipment on hand when time is critical.
Prioritize Personal Safety
When a thru-hull leak occurs, prioritizing personal safety is essential before taking any further action. Your first goal is to ensure your well-being and avoid injury or exposure to potential hazards. Stay calm and assess the situation quickly, maintaining awareness of your surroundings. Follow basic marine safety protocols, such as wearing a life jacket if the situation worsens or if you’re near the water’s edge. Good emergency preparedness means knowing your safety procedures and having quick access to safety gear. Avoid rushing into the repair if conditions are unsafe; instead, focus on protecting yourself first. Remember, your safety is the top priority—only after securing yourself can you effectively respond to the leak and minimize damage. Additionally, understanding the importance of exploring new content formats can help you stay adaptable in emergency situations. Recognizing essential safety equipment and ensuring it is readily accessible can make a critical difference during such emergencies. Being familiar with marine safety protocols enhances your ability to respond effectively and reduces potential risks during a crisis. Staying informed about leak detection techniques can also improve your response time and decision-making in urgent situations.
Locate Emergency Gear
To effectively respond to a thru-hull leak, you need to locate and gather your emergency gear quickly. Start by identifying where your emergency gear is stored—life jackets, fire extinguishers, and first aid kits should be easily accessible. Grab your leak detection tools, such as flashlights, mirrors, or electronic sensors, to help pinpoint the leak’s location. Ensuring you have these items ready minimizes delays once you identify the problem. Keep your gear organized and within reach so you can act swiftly without wasting time searching. Remember, your safety comes first, so don’t forget to put on your personal flotation device if needed before handling any equipment. Quick access to the right emergency gear can make all the difference during a crisis. Additionally, understanding piercing care and hygiene can help prevent infections that could complicate emergency situations onboard. Familiarizing yourself with emergency procedures can also improve your response time and effectiveness during a leak incident. Being aware of safety protocols ensures you follow the proper steps to contain and repair the leak safely. Practicing regular drills can further prepare you to respond efficiently when seconds count. Moreover, knowing about dog breeds can help in planning for additional safety measures if your pet is onboard during emergencies.
Assess Immediate Risks
What’s the first step when you discover a thru-hull leak? You need to assess immediate risks by conducting a quick risk assessment and hazard identification. Determine how much water is entering and if it threatens your vessel’s stability or safety. Check for hazards like electrical systems, fuel leaks, or loose debris that could worsen the situation. Confirm your safety first by putting on life jackets and activating safety signals. Gather emergency equipment such as bilge pumps, communication devices, and first aid kits. Identifying hazards early helps you prioritize actions and prevent escalation. Staying alert and focused allows you to respond quickly and effectively. Stay alert, keep a clear head, and focus on the most immediate risks to protect yourself and your crew before taking further steps. Remember to maintain situational awareness throughout the process to respond effectively. Being aware of Free Floating hazards can help you better understand the risks associated with various situations at sea. Additionally, understanding the vessel’s stability is crucial to managing the situation effectively and avoiding capsizing.

A/M-33 All Clear Automatic/Manual Inflatable Life Jacket – Orange
Switchable Inflation: Manual control for wet conditions or water immersion risk
As an affiliate, we earn on qualifying purchases.
As an affiliate, we earn on qualifying purchases.
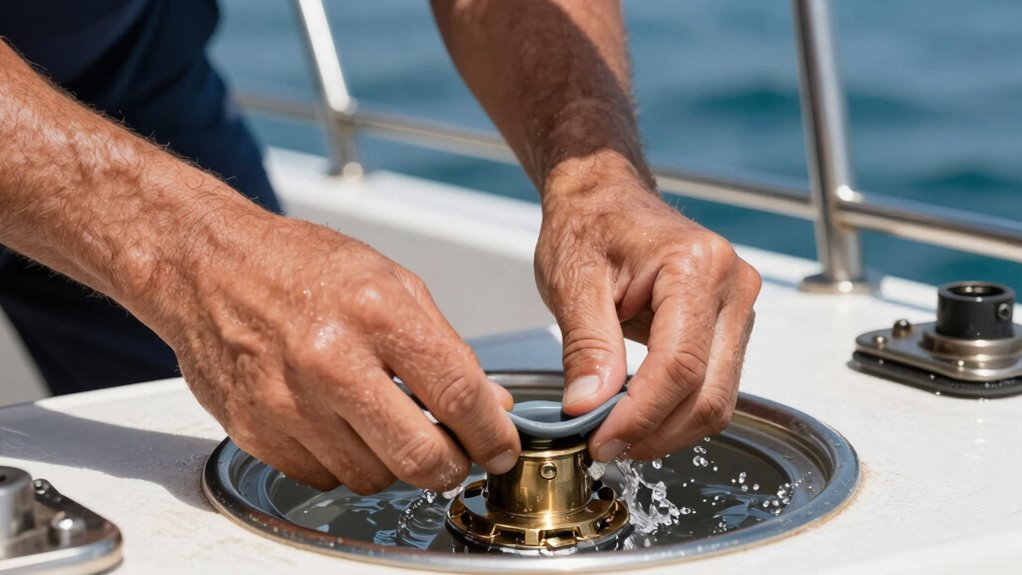
Shut Off the Water to Stop the Leak
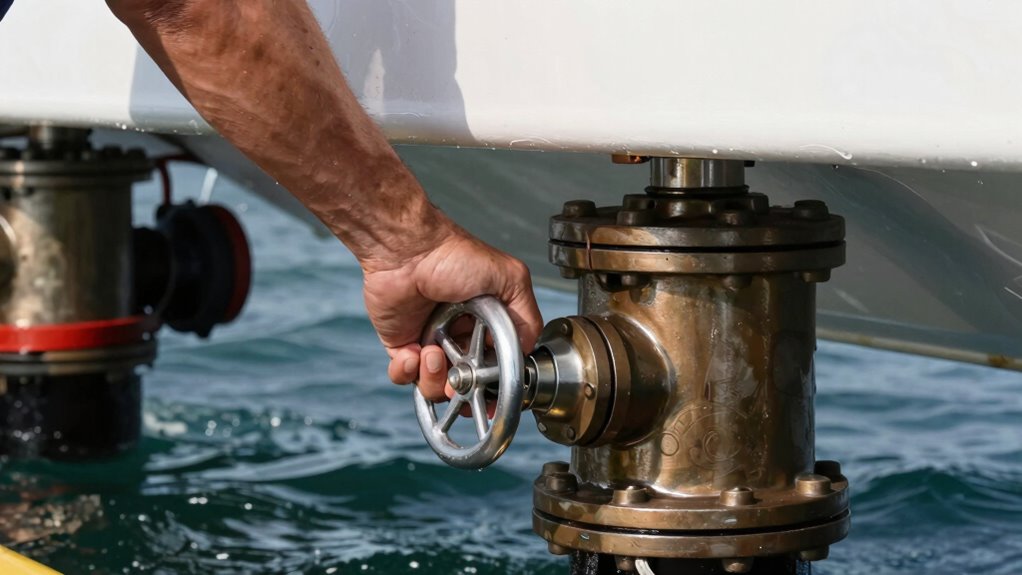
The quickest way to stop a thru-hull leak is to shut off the water supply immediately. This halts water flow, reducing water pressure and preventing the leak from worsening. The leak severity determines how urgent this step is—if water is gushing out rapidly, shutting off the source is critical. Locate the main valve or seacock and turn it off firmly. Don’t waste time searching; act swiftly to minimize water damage. Remember, decreasing water pressure at the leak reduces flow and potential harm. Once shut off, assess the situation to see if the leak diminishes or stops altogether. If water continues to leak despite shutting off the supply, additional measures may be necessary. Acting promptly is essential to protect your vessel from extensive water intrusion.

Attwood 1/4-Inch NPT x 1/4-Inch NPTF Shut-Off Valve
Shut-off valve
As an affiliate, we earn on qualifying purchases.
As an affiliate, we earn on qualifying purchases.
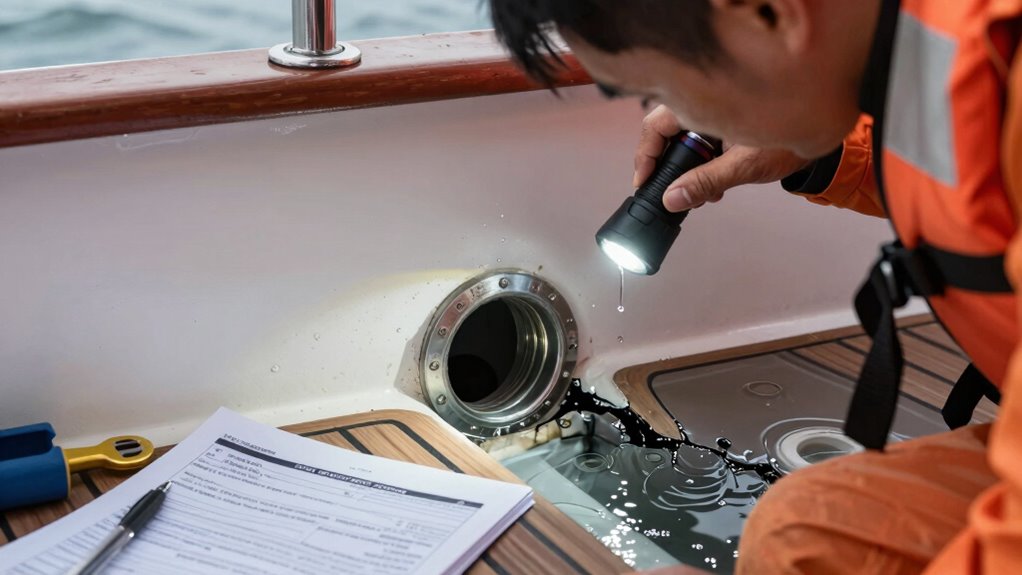
Find and Assess the Leak Location
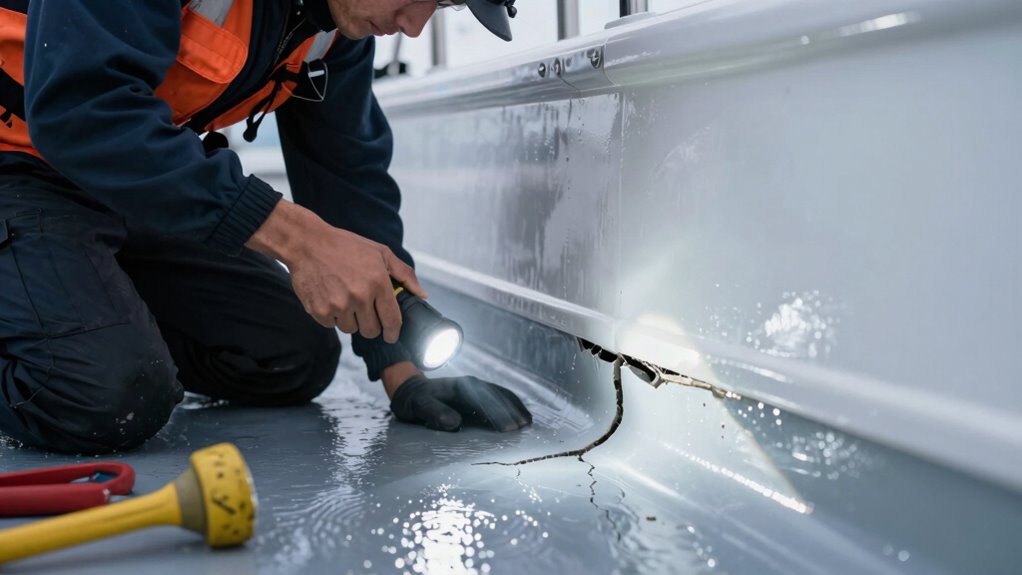
To locate the leak, start with a thorough visual inspection of the hull and surrounding areas. Look for signs like moisture, corrosion, or discoloration that indicate where water is escaping. You can also use leak indicators, such as specialized dyes or pressure tests, to help identify the exact source quickly.
Visual Inspection Techniques
When searching for a thru-hull leak, visual inspection is your first and most essential step. Use inspection tools like flashlights, mirrors, and magnifiers to enhance your view. Look for visual cues such as cracks, corrosion, or water stains around fittings and hull penetrations. Carefully examine the area around the suspected leak for signs of moisture or damage. Your goal is to pinpoint the exact location quickly and accurately.
| Tool | Purpose | Visual Cue |
|---|---|---|
| Flashlight | Illuminate dark spots | Water streaks or drips |
| Mirror | Check hard-to-see areas | Cracks or corrosion |
| Magnifier | Detect small damages | Fine cracks or pitting |
| Gloves | Protect hands during inspection | Water or rust buildup |
| Rags | Clean surfaces for better view | Water pooling or residue |
Use of Leak Indicators
Using leak indicators effectively is crucial for accurately locating and evaluating a thru-hull leak. Start by ensuring your leak detection technology is properly calibrated; sensor calibration is key to reliable readings. Visual signs like drips or water streaks can point you toward the leak, but sensor-based indicators provide precise data. Use portable leak detection devices that react to moisture or pressure changes, confirming the leak’s exact location. Keep sensors clean and calibrated regularly to maintain accuracy. When readings indicate a leak, cross-reference with visual inspection to pinpoint the source. Proper use of leak indicators accelerates the assessment process, helping you respond swiftly and effectively to minimize damage. Accurate sensor calibration and technology are your best tools for quick, confident leak detection.
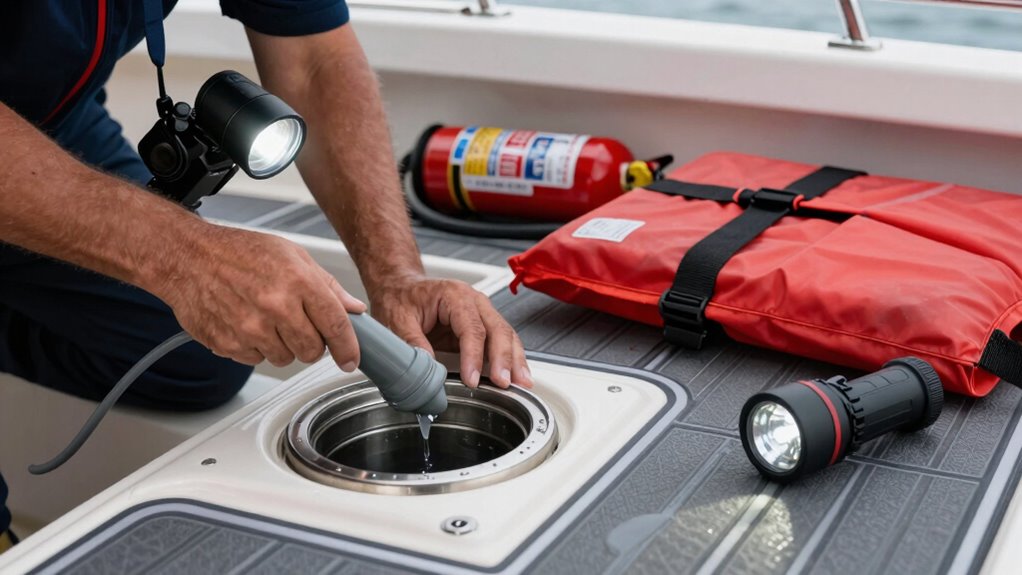
Apply Temporary Fixes to Control Water Intrusion
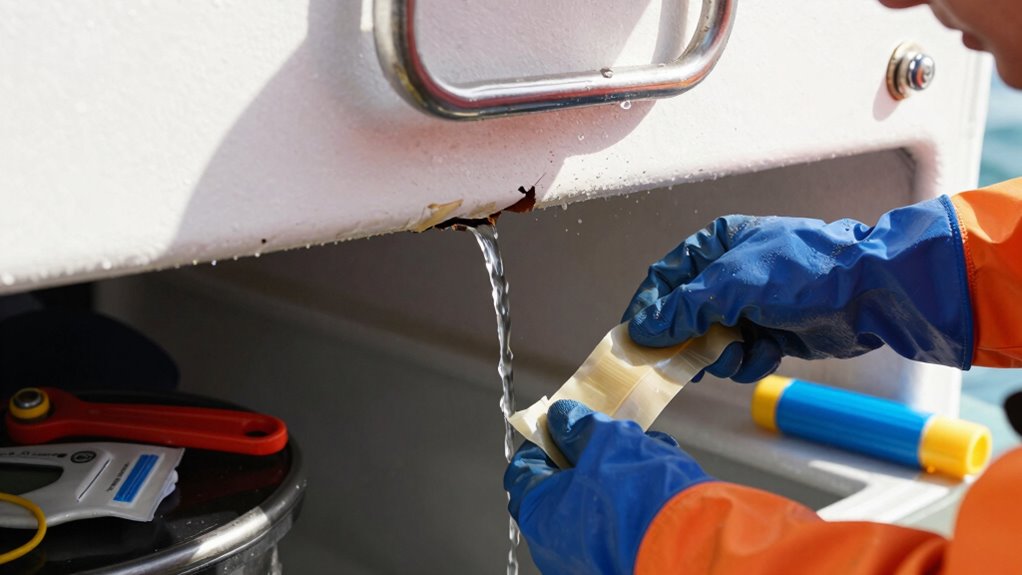
In situations where a thru-hull leak occurs, applying a temporary fix quickly is essential to minimize water intrusion and prevent further damage. Your goal is to contain the leak and buy time until permanent repairs can be made. Use materials like epoxy, rubber, or tarp for temporary patching. Ensure the area is dry before application. Seal the leak area firmly to prevent water from seeping in further. The table below offers ideas for effective leak containment:
| Material | Method | Tips |
|---|---|---|
| Epoxy | Apply directly over leak | Use gloves, ensure dry surface |
| Rubber/Plugs | Seal around the opening | Secure tightly, check for gaps |
| Tarp or Plastic | Cover and secure with tape | Use waterproof tape, tighten |
These steps help control water intrusion until permanent repairs are possible.
Call for Help and Coordinate Rescue Efforts

Promptly calling for help is essential once a thru-hull leak occurs, as it guarantees rescue teams are alerted and can respond quickly to your situation. Use your marine communication devices—VHF radio or satellite phone—to notify emergency services and provide clear details about your location and the severity of the leak. Effective rescue coordination depends on accurate, timely information, so stay calm and speak clearly. Signal nearby vessels if possible, and activate any distress signals or AIS beacons to enhance visibility. Ensuring everyone on board understands the call for help helps streamline rescue efforts. Remember, swift communication can make the difference between a manageable situation and a disaster. Prioritize your safety by initiating rescue coordination immediately.
Plan Permanent Repairs to Prevent Future Leaks
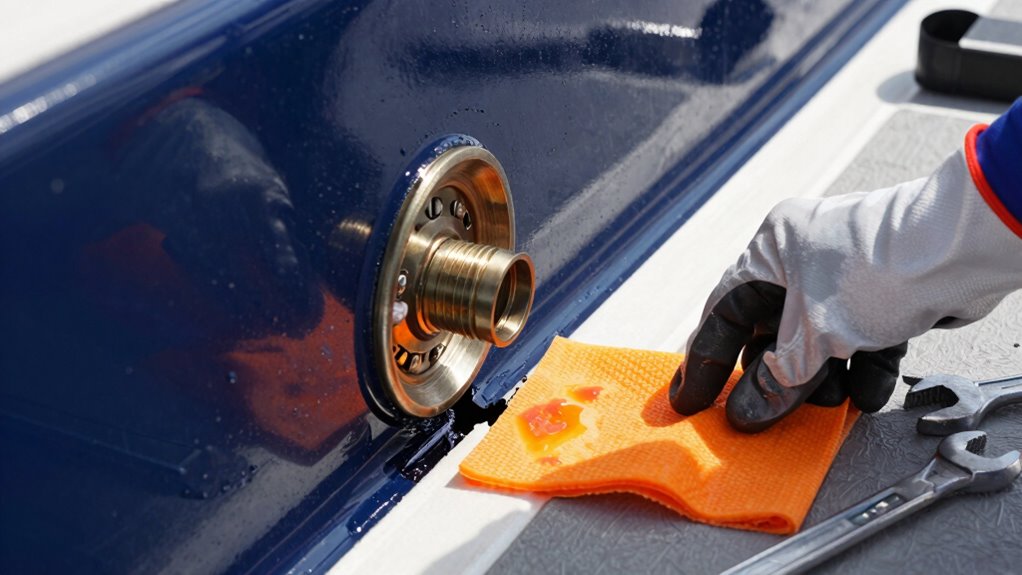
To prevent future leaks, you need to plan and execute permanent repairs promptly and effectively. Start by selecting the right materials, such as marine-grade epoxy, bronze, or stainless steel, suited for your hull and environmental conditions. Proper material selection guarantees durability and compatibility, reducing the risk of recurring issues. Incorporate long-term planning into your repair process—consider the vessel’s usage, exposure to elements, and potential stress points. Document the repair steps for future reference and maintenance schedules. Once you’ve secured a reliable material, remove damaged sections carefully, and ensure a thorough seal. Regular inspections after repairs help catch early signs of wear. With a well-thought-out plan and quality materials, you minimize the chance of future leaks and keep your vessel safe at sea.
Frequently Asked Questions
How Can I Differentiate Between a Thru-Hull Leak and Other Water Sources?
You can differentiate a thru-hull leak by performing a visual inspection around the hull area, looking for signs of water intrusion near fittings or openings. Check water source identification by noting where the water is coming from—if it’s near the hull and consistent with seawater, it’s likely a thru-hull leak. Compare water color, flow, and location to other sources to confirm it’s a leak rather than rain or internal plumbing.
What Are the Best Temporary Materials for Sealing a Thru-Hull Leak?
For sealing a thru-hull leak temporarily, use quick fixes like epoxy putty, marine-grade silicone, or rubber patches. These temporary sealants are easy to apply, quick to set, and provide a reliable barrier. You want materials that are waterproof, flexible, and adhere well to wet surfaces. Always have these supplies onboard, and remember, quick fixes are just temporary—plan to replace or repair the thru-hull properly as soon as possible.
How Do I Prevent Panic and Maintain Control During an Emergency?
When facing an emergency, stay calm by practicing calming techniques like deep breathing or counting to ten. Focus on stress management by keeping your mind clear and avoiding panic. Remind yourself that you have the skills and knowledge to handle the situation. Maintain control by staying deliberate and steady, which helps you think clearly and act effectively. Remember, keeping your composure is vital to managing the crisis successfully.
What Safety Gear Should Crew Members Wear During Leak Response?
You should wear proper personal protective equipment, such as gloves, safety goggles, and waterproof gear, to safeguard yourself during leak response. Make certain you have emergency communication devices, like radios, readily accessible to coordinate with crew members quickly. Wearing the right gear helps prevent injury, keeps you safe, and allows you to focus on controlling the leak efficiently while maintaining clear communication throughout the situation.
How Often Should I Inspect Thru-Hulls to Prevent Future Leaks?
Think of your boat’s thru-hulls like the heartbeat of your vessel. You should inspect them at least quarterly, ensuring they’re in top shape. Stick to a strict inspection schedule and use a detailed maintenance checklist to catch issues early. Regular checks help prevent leaks and keep your boat seaworthy. Don’t wait for trouble—be proactive and make inspections part of your routine to safeguard your journey.
Conclusion
A thru-hull leak can be a serious emergency—knowing how to respond quickly can save your vessel and lives. Act fast, shut off water, and apply temporary fixes until help arrives. Did you know that over 60% of boat sinkings are caused by hull or thru-hull failures? Staying calm and prepared makes all the difference. Practice these steps regularly, and you’ll be ready to handle a leak confidently, protecting yourself and others on board.