
To spot water intrusion early in your lower unit oil, regularly check the oil’s color and consistency. Look for milky or cloudy appearance, frothy texture, or discoloration after exposure to rain or splashes. Drain small samples into a clear container to see if water separates out or use test strips designed for water detection. Quick detection can prevent damage, and if you notice signs of water, it’s time to take action—keep going to learn more.
Key Takeaways
- Inspect oil color and consistency for milky, cloudy, or frothy appearance indicating water intrusion.
- Drain small oil samples into a clear container to observe separation or water settling.
- Use test strips designed for detecting water in oil for quick, accurate assessment.
- Check drain and fill plugs for corrosion, damage, or leaks that could allow water entry.
- Address signs of water contamination promptly by draining and replacing the oil to prevent damage.
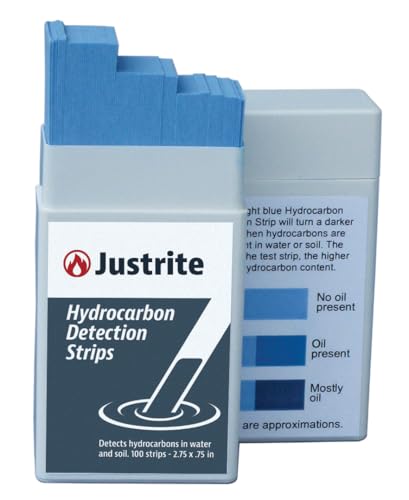
Justrite Hydrocarbon Test Strips for Oil and Water, 2.75" x 0.75" Instant Results, Pack of 100, Blue, 26486
Instant Results – Our oil tester strips change from light blue to dark blue upon contact with hydrocarbons,…
As an affiliate, we earn on qualifying purchases.
As an affiliate, we earn on qualifying purchases.
Why Water in Your Lower Unit Oil Can Damage Your Boat
Water in your lower unit oil can cause serious damage to your boat’s engine. When water intrusion occurs, it mixes with the oil, leading to oil contamination. This mixture reduces the oil’s lubricating properties, increasing friction and wear on crucial components like gears and bearings. Over time, water-laden oil can cause corrosion inside the lower unit, weakening metal parts and accelerating damage. Additionally, water contamination can lead to overheating, as proper lubrication is compromised. Ignoring water in your lower unit oil risks costly repairs and engine failure. Regularly checking your lower unit oil helps detect water intrusion early, preventing extensive damage and ensuring your boat runs smoothly and reliably. Keeping your oil clean and dry is essential for peak performance. Recognizing early signs of water intrusion is akin to understanding a boat’s golf heritage, emphasizing the importance of preventative care. Being aware of water contamination in your oil is crucial for maintaining engine health and avoiding unexpected breakdowns. An effective way to prevent water intrusion is to perform regular inspections, much like maintaining a air purifier to ensure optimal air quality in your environment. Furthermore, understanding how lower unit design affects water intrusion can help you take targeted preventative measures. Additionally, using high-quality seals and regularly inspecting the seal integrity can significantly reduce the risk of water entering the system.

SeaSierra Marine Lower Unit Gear Lube Oil Pump for Mercury Yamaha Honda Suzuki Outboard and Mercruiser Out Drive
VERSATILE & MULTI-PURPOSE: A go-to tool for everyday fluid transfer. Whether you're performing routine automotive maintenance or changing…
As an affiliate, we earn on qualifying purchases.
As an affiliate, we earn on qualifying purchases.
How to Spot Water in Your Lower Unit Oil
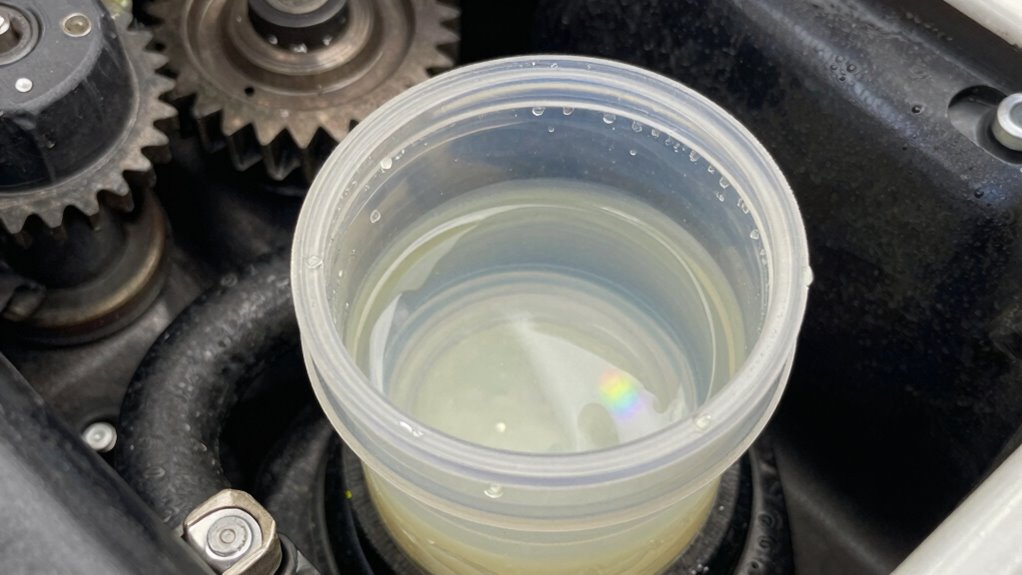
You can tell water is in your lower unit oil if it looks milky or cloudy. Performing a simple water test, like using a water-finding paste or a test strip, can confirm its presence. Catching these signs early helps prevent serious damage to your boat’s lower unit. Recognizing signs of regional environmental factors can also help you understand the typical environments where water intrusion might occur. Additionally, understanding power tool safety & setups can assist you in maintaining your equipment properly, reducing the risk of leaks or contamination. Regularly inspecting your marine gear can further aid in early detection and prevention of water intrusion issues.
Milky Oil Indicators
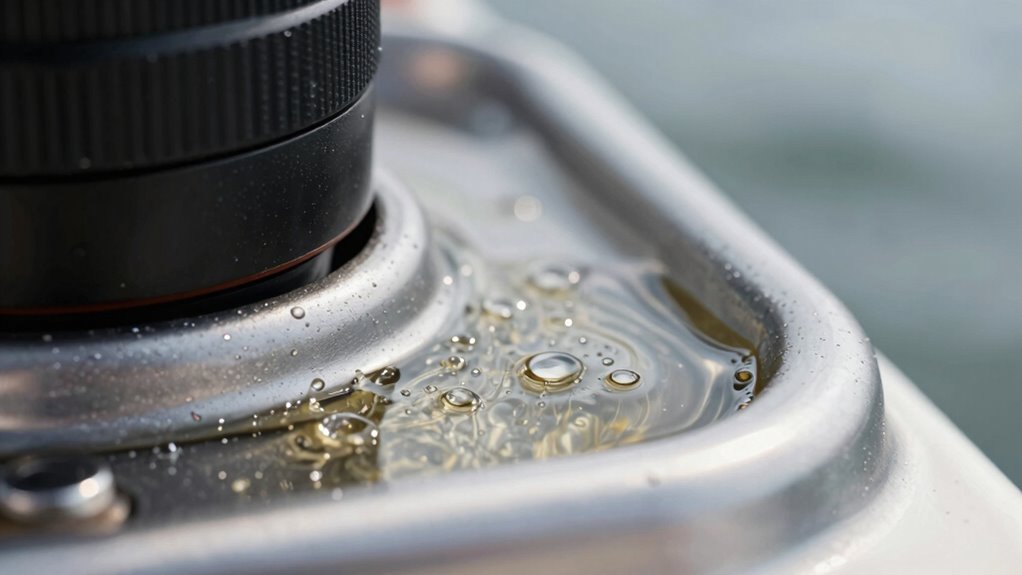
Ever wondered how to tell if your lower unit oil has water in it? One of the clearest signs is milky oil. When water intrusion occurs, it mixes with the oil, creating a cloudy, opaque appearance that looks like milk. If you pull your lower unit oil fill cap and see a frothy, milky substance, water has likely entered the system. This discoloration indicates water contamination, which can lead to corrosion and damage if not addressed promptly. Regularly checking the oil’s color and consistency can help you catch water intrusion early. Keep an eye out for any signs of milky oil, especially after periods of heavy rain or if your boat has taken a splash, to prevent costly repairs down the line. Using proper maintenance tools can also help ensure accurate and safe inspections. Being aware of water intrusion indicators allows for quicker responses and minimizes engine damage risks. Additionally, monitoring the oil’s horsepower output can help detect performance issues caused by water contamination. Incorporating filtration systems can further protect your lower unit from debris and water ingress.
Water Test Methods
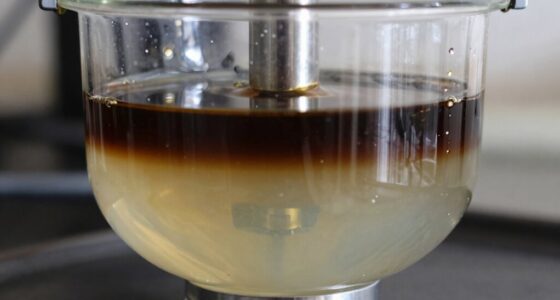
To accurately determine if water has entered your lower unit oil, performing specific water test methods can be be very effective. One common approach is the water displacement test: drain a small amount of marine lubricants from the lower unit into a clear container. If water has intruded, you’ll notice a separation or a cloudy appearance, often with water settling at the bottom. Another method involves using a test strip designed for detecting water contamination in oil. Additionally, inspecting the oil’s appearance for milky or frothy qualities can indicate water presence, which can compromise engine cooling. Water intrusion detection techniques are essential for early problem identification. Regularly checking for water intrusion helps prevent damage to your lower unit and ensures the marine lubricants are doing their job effectively. Early detection keeps your engine running smoothly and prolongs its lifespan.

ecocstm Strong Magnetic Oil Drain Plug Remover Tool, Oil Drain Plug Remover Instrument, Anti Scald Sump Plug Removal Tool, Universal Flexible Oil Plug Removal Tool (14 Inch)
Premium Material: The oil plug removal tool is made of solid steel wire, high strength to ensure its…
As an affiliate, we earn on qualifying purchases.
As an affiliate, we earn on qualifying purchases.
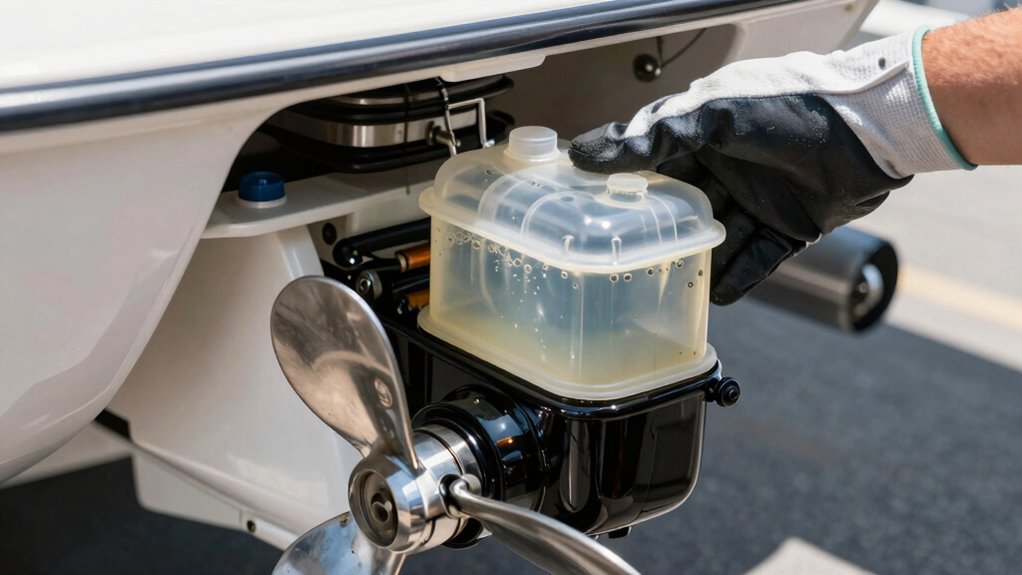
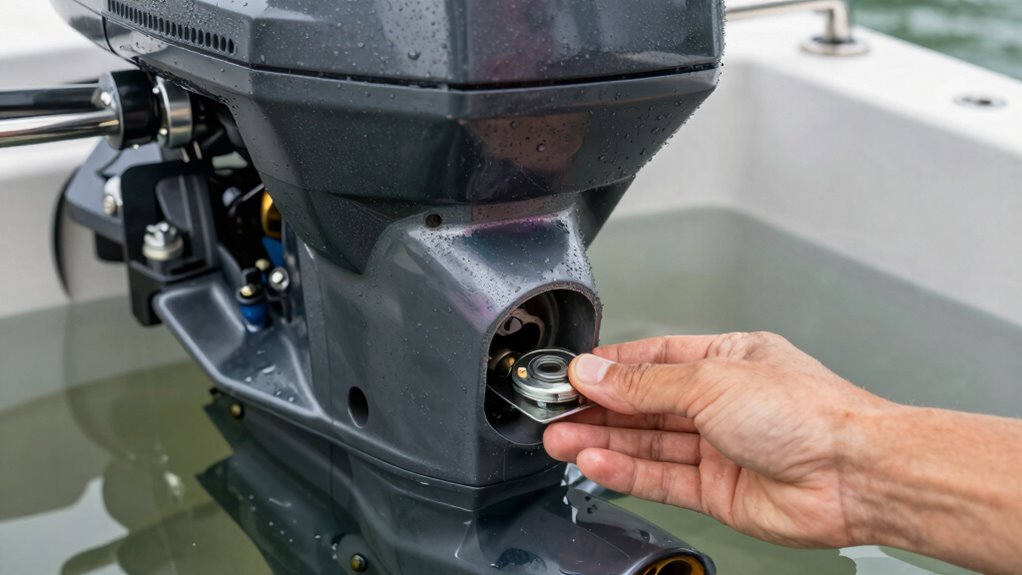
How to Check and Drain Your Lower Unit Oil Safely
Before you start, make sure you wear the proper safety gear to protect yourself. Next, locate the drain and fill plugs on the lower unit so you can access the oil easily. Additionally, inspect the oil for signs of contamination, like water or debris, to determine if a drain and refill are necessary. Be aware of potential heat buildup that could cause the oil to overheat and compromise your safety during the process. Remember that water intrusion detection is crucial for preventing engine damage and ensuring safe operation. Additionally, understanding mythology-inspired names can give you a sense of strength and wisdom as you undertake this maintenance task, helping you stay calm and focused. Additionally, dream symbolism related to water and clocks can offer insights into your awareness of time and life’s uncertainties during this maintenance task.
Prepare Safety Gear Properly
Ensuring you have the proper safety gear is essential before checking or draining your lower unit oil. Always wear protective gear, including gloves and safety goggles, to shield yourself from hot oil and debris. Follow safety protocols by working in a well-ventilated area and ensuring the engine is off and cool. Use sturdy gloves to prevent burns or skin contact with oil, which can be harmful or irritating. Safety goggles protect your eyes from splashes. Confirm your workspace is clear of tripping hazards and keep tools within reach. Taking these precautions minimizes risks and keeps you safe throughout the process. Proper safety gear and adherence to safety protocols make the oil check or drain safer and more efficient. Proper safety practices are essential for preventing accidents during fluid maintenance. Additionally, understanding the water intrusion signs can help you address potential problems early and avoid costly repairs. Maintaining a safe work environment helps ensure that your maintenance routine is both effective and accident-free.
Locate Drain and Fill Plugs
Locate the drain and fill plugs on your lower unit by inspecting the back or bottom portion of the gearcase. The drain plug location is usually on the lowest point of the lower unit, making it easy to remove water and old oil. The fill plug is typically positioned higher on the side or top of the gearcase, providing fill plug accessibility for adding fresh oil. Before proceeding, confirm you have the right tools to remove both plugs safely. It’s important to identify these plugs correctly to avoid damaging the threads or components. When you find the drain and fill plugs, check their condition and make sure they’re not stripped or corroded. Properly locating these plugs ensures a smooth process when draining old oil and refilling with fresh lubricant.
Inspect Oil for Contamination
Checking your lower unit oil for contamination is a crucial step in maintaining your boat’s performance. To do this, carefully remove the drain plug and collect an oil sample in a clean container. Examine the sample closely for signs of water, milky appearance, or metal shavings, which indicate contamination detection. If the oil looks cloudy or has a frothy texture, water intrusion is likely. Smell the oil for a burnt odor, which suggests overheating or debris. Regular inspection helps you catch issues early before they cause serious damage. If contamination is present, drain the oil completely, clean the area, and replace it with fresh gear oil. Performing these checks routinely ensures your lower unit stays in prime condition and prolongs its lifespan.

Underground Water Leak Detector with Adjustable 4 Gears Frequency,Pipeline Leak Detector with Sensor,Water Leak Detection Kit,Leak Detector
☑【Multi-function Water Leak Detector】: Our Water Leak Detector Is Suitable for Different Leak Detection of Outdoor Water Pipes,…
As an affiliate, we earn on qualifying purchases.
As an affiliate, we earn on qualifying purchases.
Recognizing Water in Oil by Its Color and Texture
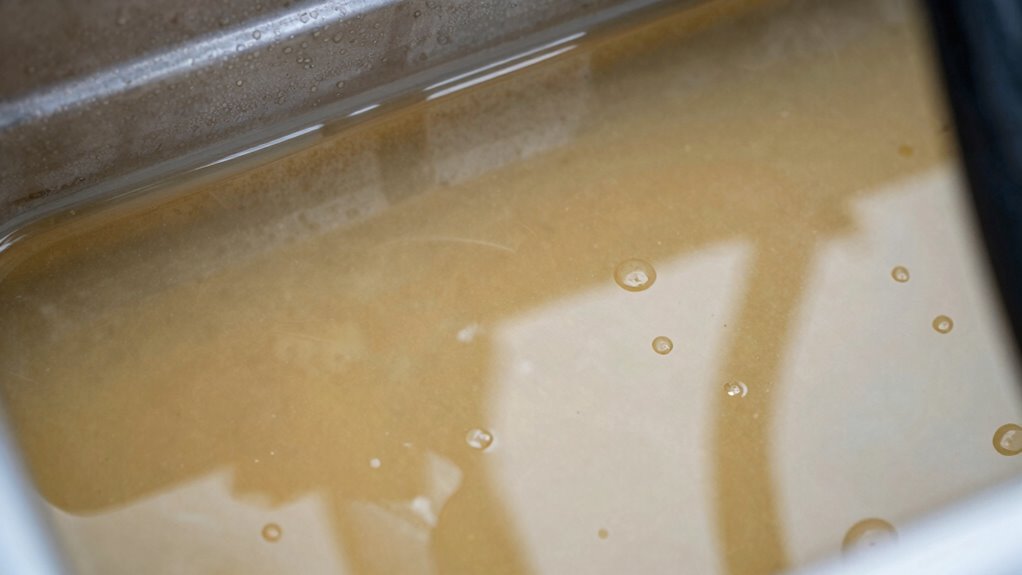
Water in your lower unit oil can often be identified by its distinct color and texture. Fresh oil typically has a clear, amber hue, but when water mixes in, the oil may turn milky or cloudy. You might notice a lighter, whitish tint or a film on the surface. The oil texture also changes—water creates a thinner, more watery consistency that feels slick or watery to the touch. Sometimes, you’ll see bubbles or foam forming on top of the oil, indicating water presence. These visual cues are your first signs of water intrusion. Regularly checking the oil’s color and texture helps you catch water early before it causes more significant damage. Trust these signs, and you’ll stay ahead of potential lower unit issues.
What Causes Water Intrusion in the Lower Unit and How to Prevent It

Water can enter the lower unit through several common pathways, often starting with small cracks or leaks in seals and gaskets. Seal failures are a primary cause, especially if seals degrade over time or are improperly installed. Corrosion prevention is essential; moisture inside promotes rust, weakening components and increasing leaks. To prevent water intrusion, regularly inspect and replace worn seals and gaskets promptly. Using quality sealants and ensuring proper installation reduces the risk of leaks. Maintaining proper lubrication and avoiding prolonged exposure to water also helps prevent corrosion.
| Cause | Prevention Method |
|---|---|
| Seal failures | Regular inspection and replacement |
| Corrosion | Proper lubrication and corrosion prevention techniques |
| Cracks or leaks | Prompt repair and quality sealant use |
When Should You Seek Help for Water Contamination?

Knowing when to seek help for water contamination in your lower unit can prevent costly damage and extend the life of your boat. If you notice milky oil or unexplained water in the lower unit, it’s time to act. Promptly addressing seal leaks helps prevent water from entering and causing corrosion. Regularly inspecting the lower unit for signs of water intrusion ensures you catch issues early. If water remains in the oil despite simple fixes, consult a professional to prevent corrosion and further damage. Don’t ignore these signs—early intervention saves money and protects your engine’s longevity. Proper seal maintenance and timely assistance are key to avoiding extensive repairs and ensuring your boat runs smoothly.
Quick Tips for Maintaining Your Lower Unit and Avoiding Water Issues
Regularly inspecting and maintaining your lower unit is essential to prevent water intrusion and costly damage. Keep an eye on oil levels and look for signs of water contamination, such as milky fluid. Use these quick tips to stay ahead:
| Maintenance Step | Benefit |
|---|---|
| Check and replace lower unit oil regularly | Prevent water intrusion and corrosion |
| Inspect for cracks or damage | Avoid water entry points |
| Keep drain plugs tight and clean | Minimize water leaks |
Perform marine maintenance routines monthly, especially before and after storage or use in rough conditions. Regular inspections help identify early water intrusion signs, saving you time and money. Consistent care keeps your lower unit in top condition and prolongs its lifespan.
Frequently Asked Questions
What Are the Long-Term Effects of Water in the Lower Unit Oil?
Water in the lower unit oil can cause corrosion damage and accelerate lubricant degradation. Over time, this weakens metal parts, leading to potential gear failure or costly repairs. You might notice reduced performance or strange noises. To prevent long-term issues, regularly check and change the oil, especially if water intrusion is suspected. Staying vigilant helps protect your equipment and extends its lifespan, saving you money in the long run.
Can Water Damage Be Reversed if Caught Early?
Yes, water damage can often be reversed if you catch it early. When you spot water intrusion in the lower unit oil, you should perform a thorough drain and refill with fresh oil. In some cases, you might need to replace seals or perform a flush. Quick action reduces long-term damage, and repair options include cleaning, replacing worn parts, or resealing to restore proper function and prevent corrosion.
How Often Should I Check My Lower Unit Oil for Water Contamination?
You should check your lower unit oil for water contamination at least every 50 hours of operation or once a season, whichever comes first. Incorporate regular maintenance schedule checks and use proper inspection techniques, such as inspecting the oil for milky appearance or testing for water presence. Keeping up with these inspections helps detect water intrusion early, preventing more significant damage and ensuring your boat runs smoothly.
Are There Specific Boat Models More Prone to Water Intrusion?
Think of some boat models as delicate sponges, more prone to water intrusion due to their design vulnerabilities. Certain models, especially older or poorly maintained ones, exhibit specific water intrusion patterns, making them more susceptible. You should pay close attention to these vulnerabilities, regularly checking for water contamination, especially after rough waters or long storage. Being proactive helps you catch issues early before they cause costly damage.
What Tools Are Best for Inspecting and Removing Water From the Lower Unit?
You should use inspection tools like a flashlight, mirror, and a bore scope to check for water intrusion. These tools help you spot water in the lower unit quickly. For water removal, a hand pump or a siphon pump works best to extract water efficiently. Regularly inspecting with these tools and promptly removing any water helps prevent damage and keeps your boat running smoothly.
Conclusion
Regularly checking your lower unit oil can prevent costly damage—did you know that water intrusion causes over 60% of gear failures? By spotting water early, you can avoid corrosion and expensive repairs. Keep an eye on oil color and texture, and drain it safely when needed. Staying proactive guarantees your boat stays reliable and ready for your next adventure. Don’t wait—maintenance today saves you money and stress tomorrow.