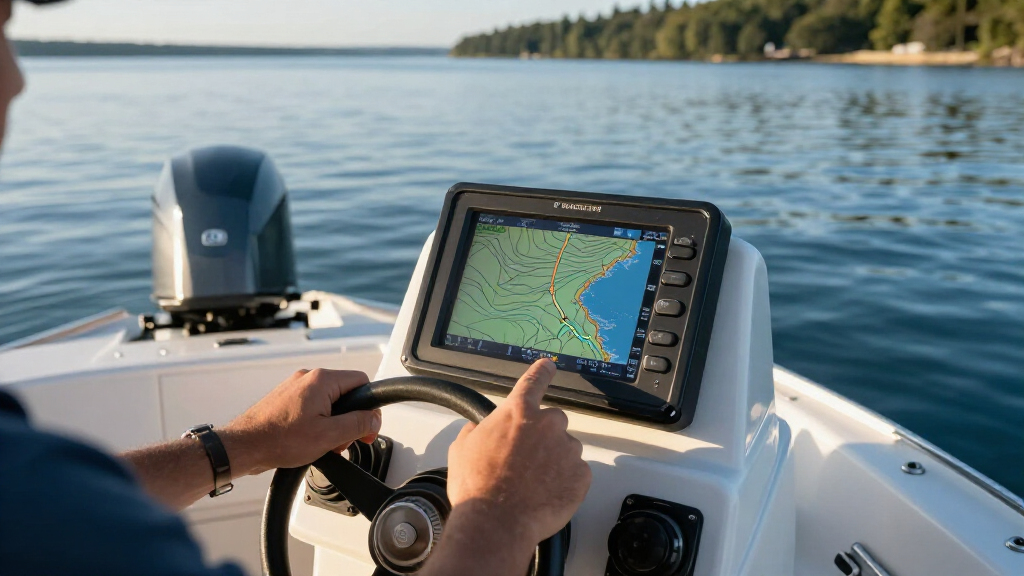
Install and check a basic marine electronics setup for a recreational boat: a chartplotter, fixed VHF radio, and depth transducer. This guide is for boat owners who can use hand tools and follow wiring instructions but have not planned a full electronics installation. Allow 4–8 hours, with extra time if you need to route cables through sealed or crowded spaces.

Get sports gear delivered free with Prime
- Fast, free delivery on millions of items
- Prime Video, Amazon Music and more included
- Member-only deals all year

Simrad GO Chartplotter and Fish Finder, with Transducer and Radar Options, Preloaded C-MAP Discover Chart Card
- ✔ Display: 9-inch capacitive touchscreen
- ✔ Included charts: C-MAP Discover, U.S. and Canada coverage
- ✔ Sonar: 83/200 kHz HDI transducer; CHIRP and DownScan Imaging

Garmin Striker Vivid 7cv, U.S. with GT20-TM Transducer – Easy-to-Use 7-inch Color Fishfinder and Sonar Transducer, Vivid Scanning…
- ✔ Display: 7-inch color LCD
- ✔ Transducer: GT20-TM included
- ✔ Traditional sonar: Garmin CHIRP
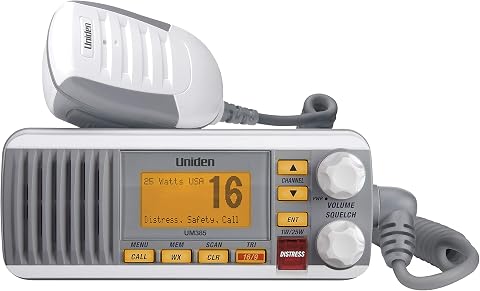
Uniden UM385 Marine VHF Radio, 25-Watt Fixed Mount, IPX4 Waterproof, White
- ✔ Radio type: Fixed-mount marine VHF
- ✔ Transmit power: 25 watts
- ✔ Channels: 40 listed; USA, international and Canadian channels
Difficulty: Intermediate | Time: 4–8 hours
What You’ll Need
Tools & Materials:
- Marine chartplotter, fixed VHF radio, and compatible depth transducer
- Manufacturer installation manuals and current boat wiring diagram
- Marine-grade tinned copper wire, correctly sized for each device and cable run
- Fuse holders and fuses specified by each manufacturer
- Marine heat-shrink crimp terminals and a ratcheting crimper
- Multimeter, wire strippers, drill, bits, and hole saw suited to the mounting hardware
- Cable supports, grommets, sealant approved for the boat’s materials, and corrosion-resistant fasteners
- Eye protection and hearing protection
Knowledge:
- Basic use of hand tools and a multimeter
- Ability to identify the battery, battery switch, ground bus, and existing electronics wiring
- Ability to read equipment wiring and mounting diagrams
Check that the chartplotter, radio, and transducer work together before buying or drilling. Confirm voltage, network type, connector compatibility, transducer location, cable length, and each device’s fuse requirement. If the boat has unusual wiring, a metal hull, a high-current system, or no reliable wiring diagram, have a qualified marine electrician plan the power connections.
Simrad GO Chartplotter and Fish Finder, with Transducer and Radar Options, Preloaded C-MAP Discover Chart Card
The Simrad GO9 XSE earns the top spot because it can anchor a broader helm setup than either of the other picks. Its 9-inch touchscreen combines GPS chartplotting, C-MAP Discover charts, sonar support and NMEA 2000 connectivity. For boaters who want navigation and engine or sensor data on one display, that network support can reduce dashboard clutter and make information easier to reach. The included chart card covers the U.S. and Canada, with vector charts, tides and currents, and bathymetric contours.Compared with the Garmin STRIKER Vivid 7cv, the Simrad is the more complete navigation platform: it is designed to support radar and additional marine systems, whereas Garmin centers on fishfinding and waypoint basics. That breadth has a cost in complexity. Radar requires a compatible radar unit, and some sonar views require suitable transducers; the unit’s capabilities depend on the configuration and networked equipment. It also has a larger footprint than a compact fishing display. Choose it when navigation and expansion matter most, and skip it if all you need is a straightforward sonar screen or a radio.
Pros:
- 9-inch touchscreen with chartplotter and GPS functions
- Includes C-MAP Discover charts with U.S. and Canada coverage
- HDI transducer supports CHIRP sonar and DownScan Imaging
- NMEA 2000 and radar support enable broader system integration
Cons:
- Radar requires a separate compatible radar system
- Some sonar views and functions depend on optional compatible transducers or charts
- More setup and integration complexity than the Garmin fishfinder
Best for: Boaters who want chartplotting, sonar support and a network-ready display for a sportboat, center-console or smaller cruiser.
Not ideal for: Anglers seeking only an uncomplicated fishfinder, or buyers who need a fixed-mount VHF radio rather than a multifunction display.
Bottom line: We recommend the Simrad when one helm display needs to handle navigation, sonar and future system expansion.
“We recommend the Simrad when one helm display needs to handle navigation, sonar and future system expansion.”
Garmin Striker Vivid 7cv, U.S. with GT20-TM Transducer – Easy-to-Use 7-inch Color Fishfinder and Sonar Transducer, Vivid Scanning…
For a fishing-first setup, the Garmin STRIKER Vivid 7cv keeps the task in focus. The included GT20 transducer provides Garmin CHIRP traditional sonar and CHIRP ClearVü scanning sonar, while the vivid color palettes are intended to make fish and structure easier to distinguish. Built-in Quickdraw Contours lets us create and save maps with one-foot contours, so frequent anglers can build a record of local waters. GPS adds waypoint marking, route creation and boat speed.That makes Garmin a simpler fit than the Simrad when fishing sonar is the priority and chartplotter expansion is not. It does not include the same chart-card navigation platform, radar support or NMEA 2000 integration described for Simrad. Wi-Fi connects to the ActiveCaptain app for waypoint transfer and notifications, but the device remains a fishfinder rather than a full multifunction helm display. Buyers should also verify mounting space: the stated display is 7 inches, and the included bailmount hardware is aimed at practical installation. Choose this model for sonar-led fishing; skip it if your main need is coastal chart navigation or an emergency radio.
Pros:
- GT20 transducer included for CHIRP and ClearVü sonar
- Vivid palettes help distinguish sonar returns
- Quickdraw Contours creates maps with one-foot contours
- GPS supports waypoints, routes and boat-speed display
Cons:
- Fishing-focused feature set is narrower than the Simrad multifunction display
- Does not provide the listed C-MAP chartplotter and radar platform
- DSC radio communication is outside its role
Best for: Anglers who want included traditional and scanning sonar, GPS waypoints and the ability to map fishing grounds.
Not ideal for: Boaters who need full chartplotter cartography, radar capability, or a fixed-mount VHF radio in this device.
Bottom line: We would choose Garmin over the Simrad when practical fishing sonar matters more than full chartplotter integration.
“We would choose Garmin over the Simrad when practical fishing sonar matters more than full chartplotter integration.”
Uniden UM385 Marine VHF Radio, 25-Watt Fixed Mount, IPX4 Waterproof, White
The Uniden UM385 addresses a different but essential part of a boat’s electronics setup: marine VHF communication. This fixed-mount radio offers 25-watt transmission, marine channels, NOAA weather alerts and Class D DSC functions, including a distress button and position send or request features. Triple watch helps monitor multiple channels. Its rugged microphone is designed for use from the helm, and IPX4 protection covers rain or splashing water.Unlike the Simrad and Garmin, the UM385 does not show charts or sonar; its value comes from keeping communication and weather alerts at hand. It complements a chartplotter rather than competing with one, and can be a more relevant purchase than another display if the boat lacks a fixed VHF. There is a setup consideration: DSC position features rely on compatible GPS information, and the product description specifies compatibility with a Uniden GPS receiver. IPX4 also means splash resistance, not a claim of submersion protection. Choose it for radio communication and distress calling, but skip it if you are looking for route planning or fishfinding.
Pros:
- 25-watt fixed-mount VHF radio with marine channels
- Class D DSC includes distress and position-related functions
- NOAA weather alerts and triple watch support monitoring
- IPX4 protection is suited to rain and splashing
Cons:
- Does not provide chart navigation or fishfinding
- DSC position functions require compatible GPS input
- IPX4 protection does not indicate submersion resistance
Best for: Boaters who need a fixed-mount VHF radio with DSC distress functions, marine channels and NOAA weather alerts.
Not ideal for: Buyers looking for chartplotting, sonar, or one screen to integrate navigation and fishing information.
Bottom line: We recommend the Uniden when a boat needs dependable fixed-mount VHF features alongside its navigation or fishfinding electronics.
“We recommend the Uniden when a boat needs dependable fixed-mount VHF features alongside its navigation or fishfinding electronics.”
As an Amazon Associate we earn from qualifying purchases.
Before You Start
Choose mounting positions that are visible from the helm, reachable while seated or standing, and protected from direct spray as the equipment requires. Check behind every proposed hole for wiring, fuel lines, steering gear, structural members, and water tanks. Disconnect the battery at the switch before making electrical connections. Never work on live wiring, and do not use a VHF radio without a correctly installed antenna.
Follow the manuals for cable clearances, grounding, fuse placement, and sealing. Use a dedicated fused supply from the specified distribution point; do not splice into an unknown circuit. Keep data and transducer cables away from engine, ignition, and high-current wiring when possible.
Step-by-Step Instructions
Step 1: Plan equipment locations and cable routes
Lay out the chartplotter and radio at the helm, then mark positions that leave room for the connectors, mounting brackets, and service access. Trace a route from each device to its power source and, for the chartplotter, to the transducer and any network connection. Measure each run and note where cables pass through bulkheads. Mark proposed holes only after checking both sides of each surface.
Tip:Leave a service loop at each device so it can be pulled forward without straining a connector. Keep cables clear of moving steering parts and hot engine surfaces.
Check: You have a written cable route and mounting marks, and you can reach all connectors without bending a cable sharply or blocking helm controls.
Step 2: Mount the chartplotter and radio
Use the supplied template to mark each mounting hole and cable opening. Drill pilot holes first, then cut the openings to the template dimensions. Remove debris, dry-fit the brackets, and seal exposed core or bare material as the boat and sealant instructions require. Fasten each unit with corrosion-resistant hardware and fit any gasket or sealing boot supplied by its manufacturer.
Tip:Do not overtighten fasteners in fiberglass or sandwich construction. If the surface flexes or the device cannot be sealed as specified, stop and correct the mounting surface before proceeding.
Check: Both devices sit firmly, remain easy to operate, and do not interfere with helm movement or sightlines.
Step 3: Install the transducer
Choose the location and installation method specified for your transducer, such as transom, through-hull, or an approved in-hull mount. Keep it away from turbulence sources such as intakes, strakes, and propeller wash, following the transducer manual’s placement guidance. Route its cable through protected openings, fit a grommet where it passes through a sharp edge, and secure the cable without crushing it. Seal the hull opening using the specified method.
Tip:Through-hull installation can affect hull integrity and requires the correct fittings and sealing method. If you are unsure about the hull material, location, or fitting, have a marine professional install it.
Check: The transducer is firmly mounted, its cable is protected and supported, and the hull penetration is sealed according to the installation instructions.
Step 4: Route and secure the cables
Pull power, data, antenna, and transducer cables along the planned routes. Protect every pass-through with a correctly sized grommet or fitting, and support cables at intervals using suitable clips. Keep connectors dry and accessible, maintain the bend radius specified by the manufacturer, and avoid tight ties that deform the cable. Label both ends before trimming or terminating any wire.
Tip:Do not cut off factory-fitted plugs unless the equipment manual explicitly allows it. A plug that will not pass through an opening may require a larger opening or a different route.
Check: Cables are secured, labeled, protected from chafe and heat, and have enough slack for service without lying in bilge water.
Step 5: Connect fused power
With the battery switch off, connect each device’s positive and negative leads to the specified distribution point using wire sized for the full cable run and device current. Install the specified fuse in the positive lead at the location required by the manual. Use marine-grade crimp terminals, make each crimp with the matching tool, and seal the connection with adhesive-lined heat shrink where appropriate. Keep polarity correct and connect the negative return to the designated negative bus.
Tip:Do not guess at wire or fuse size. Use the device manual and applicable marine wiring guidance; a fuse that is too large may not protect the cable.
Check: Each device has a supported, labeled positive and negative connection, the specified fuse, and no exposed copper or loose strands.
Step 6: Connect the antenna and data links
Connect the VHF radio to a marine VHF antenna using the correct coaxial cable and connectors. Route and support the coax without sharp bends, and keep its connector dry and secure. Connect the chartplotter to the transducer and any compatible network devices according to the port labels and wiring diagrams. Tighten waterproof connectors as directed; do not force mismatched plugs together.
Tip:Do not transmit on a VHF radio with its antenna disconnected; transmitting without a proper antenna can damage the radio.
Check: The radio has a complete antenna connection, and the chartplotter recognizes the connected transducer or network device when powered on.
Step 7: Power up and configure the equipment
Inspect all connections, confirm the battery switch and device fuses are correctly set, then restore power. Turn on one device at a time and follow its setup prompts. Set the chartplotter’s units, location source, and chart region; enter the radio’s required vessel and emergency contact details if the model supports them. Set the correct VHF region and channels from the manual.
Tip:Use a marina-approved or radio service method for a radio check. Do not make an unneeded distress call to test the radio.
Check: Each unit starts without a low-voltage or wiring alarm, the chartplotter shows a valid position when its GPS source is available, and the radio completes its self-check.
Step 8: Test operation at the dock and underway
At the dock, verify the chartplotter’s position and confirm that the depth reading appears in suitable water. Check the VHF receive function using an approved radio check or local monitoring method. Inspect the wiring and mounting points for movement, heat, water entry, or loose connections. Then, in safe conditions and with a responsible operator at the helm, confirm that depth readings remain stable at low speed and inspect the display for warnings.
Tip:Depth readings can be unreliable in aerated water or at speed. Compare them with a known reference and follow the transducer manual before changing its position.
Check: The chartplotter displays a plausible location, the depth sounder returns readings in appropriate conditions, and the radio receives clearly with no fault messages or signs of overheating.
Common Mistakes to Avoid
- Drilling before checking behind the mounting surface. — Inspect both sides of the surface and confirm there are no wires, fuel lines, steering parts, or structural members in the hole path.
- Using automotive wire, unsealed terminals, or an oversized fuse. — Use marine-grade wire and terminals, crimp and seal connections properly, and follow the manufacturer’s wire and fuse specifications.
- Placing the transducer where turbulent water disrupts its reading. — Follow the transducer placement guidance and avoid locations near turbulence sources; check its performance in safe conditions before relying on it.
- Transmitting on the VHF radio before connecting the antenna. — Connect and inspect the antenna first, then use an approved radio check method.
Troubleshooting
Problem: A device does not power on.
Solution: Turn off the battery switch and check battery state, device fuse, polarity, terminal tightness, and voltage at the device connection against the manual. Replace a fuse only with the specified rating; if it blows again, find the short or wiring fault before restoring power.
Problem: The chartplotter shows no position.
Solution: Check that the GPS antenna has a clear view of the sky, its cable and connector are seated, and the correct GPS source is selected. Allow time for satellite acquisition and consult the manual if the unit continues to report no fix.
Problem: The depth display is blank or drops out.
Solution: Check the transducer connector, cable for damage, selected transducer source, and installation location. Test in calm, suitable water; turbulence, weeds, or shallow conditions can affect readings. Do not alter a through-hull fitting while afloat.
Problem: The VHF radio has weak reception or transmit range.
Solution: Check the antenna connection, coax for corrosion or damage, antenna placement, and radio power supply. Arrange an approved radio check. Have a marine radio technician inspect the antenna system if performance remains poor.
What Success Looks Like
The chartplotter, VHF radio, and depth transducer are mounted securely and powered through correctly fused marine wiring. Cables are supported and protected, the VHF antenna is connected, and no wiring alarms or heat appear during operation. The chartplotter can show a valid position, the depth display returns plausible readings under suitable conditions, and the radio receives clearly during an approved check.
Next Steps
Record the fuse ratings, cable routes, equipment model numbers, and setup details with the boat’s documents. Inspect terminals, cable supports, seals, antenna connections, and transducer mounting as part of routine boat maintenance, especially after heavy weather or service work. Consult a qualified marine electrician or radio technician for recurring faults, unexplained fuse failures, hull penetrations, or poor radio performance.
Frequently Asked Questions
Can I install marine electronics with basic DIY skills?
You can mount and wire many small devices if you can follow the manuals, size wiring correctly, make reliable crimps, and safely isolate the battery. Ask a qualified marine electrician to handle unfamiliar systems, high-current work, or wiring that cannot be identified confidently.
Do all chartplotters work with every transducer?
No. Check the chartplotter’s supported transducer types, connector, frequency, and network requirements before purchasing. A connector that fits does not by itself prove compatibility.
Can I test the depth sounder while the boat is on land?
A transducer generally needs suitable water contact for a useful depth reading. Some approved in-hull installations can be checked through the hull, but follow the transducer instructions and do not run a transducer out of water unless its manual allows it.
How should I test the VHF radio?
Connect the antenna before powering or transmitting. Use an approved radio-check service or local monitoring procedure, follow radio regulations, and never use a distress channel for a routine test.